Mesh Rider Radio GCS Reference Design
Introduction
In this guide, we detail the design of a Ground Control Station (GCS) using the Doodle Labs Mesh Rider Radio. There are several available form factors in the Mesh Rider Radio family, and we will discuss how the Wearable Mesh Rider Radio or the Embedded/External Mesh Rider Radios can be used in a GCS.
Figures 1 and 2 shows examples of the applications which have been demonstrated using Doodle Labs Mesh Rider Radios.

Fig. 1 Example applications using the Mesh Rider Radio (UAV)
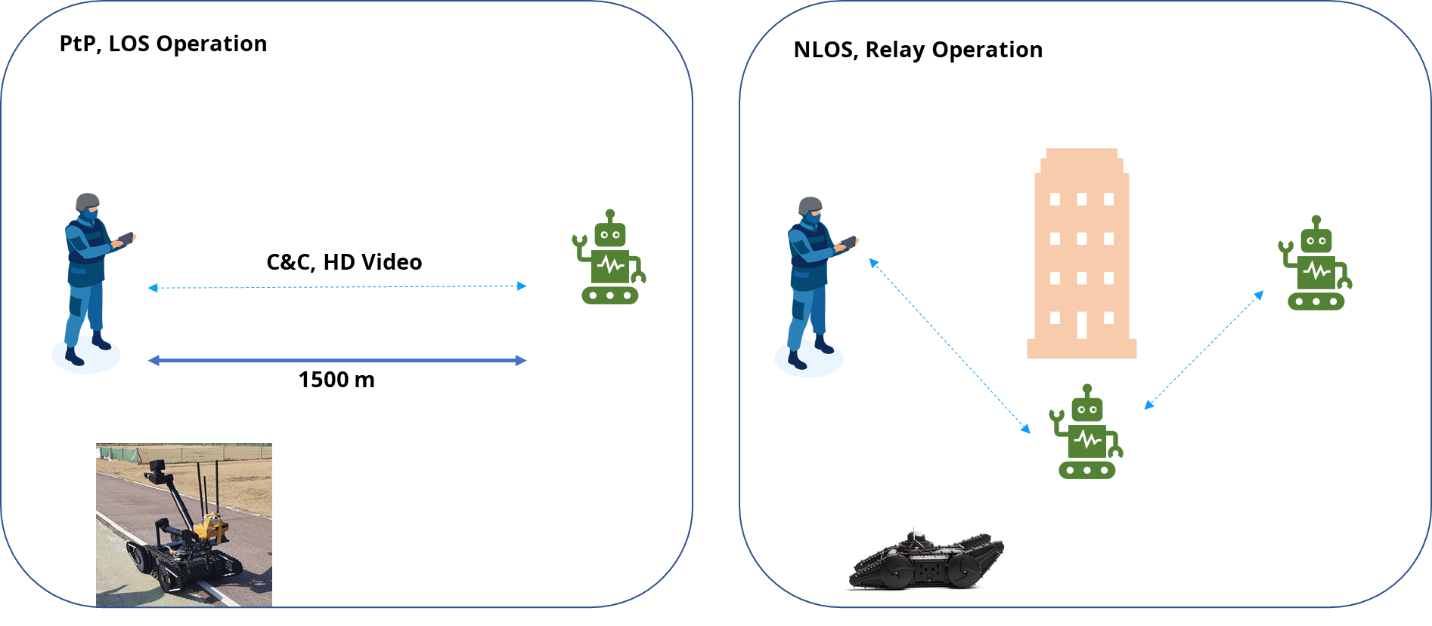
Fig. 2 Example applications using the Mesh Rider Radio (UGV)
In our experiments, the typical latency due to the radios was around 10ms. The telemetry link was stable down to the sensitivity level of the radios.
System Design
System Setup
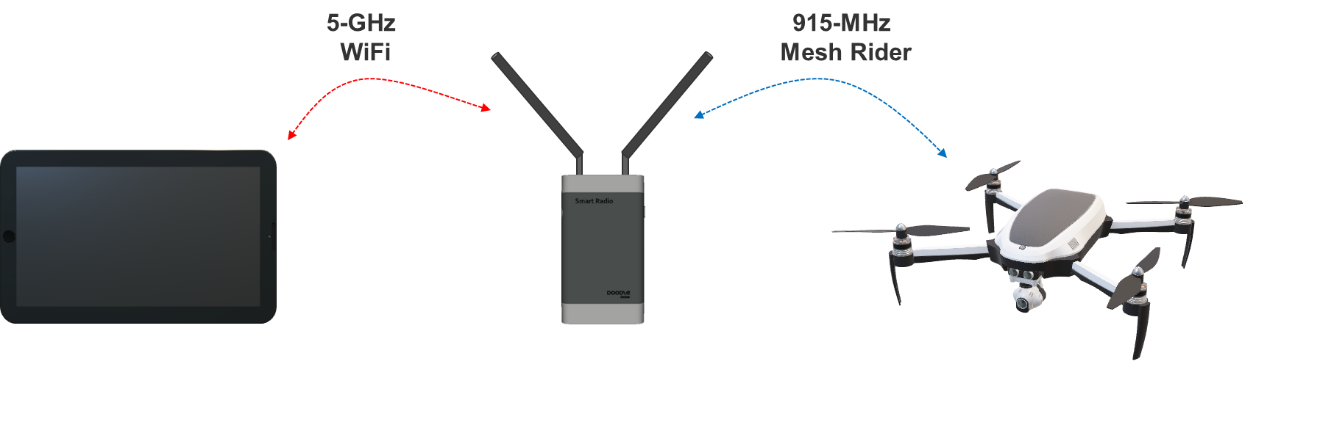
Fig. 3 GCS System Setup
Our Reference Design setup is shown in Fig. 3. Communications to the drone is provided by a Doodle Labs Wearable Mesh Rider Radio (RM-915-2K-XW). The UAV includes a Doodle Labs Embedded Mesh Rider Radio (RM-915-2J-XM). The tablet connects to the Wearable Mesh Rider Radio over it's built-in 5-GHz WiFi.
The Wearable Mesh Rider Radio can be mounted on a tripod or even carried in the backpack of the operator without the need for a wired connection to the tablet.
GCS Components
There are many different GCS software available and this reference design is based on QGroundcontrol (QGC) [1]. In general a GCS requires three different links to the UAV
- A telemetry link - the telemetry link carries status information about the drone such as it's altitude, heading, GPS location, battery status and so on. QGC uses the MAVLink protocol for telemetry [2].
- A video link - QGC integrates a video monitoring terminal capable of displaying several different IP streaming protocols.
- A control link - QGC supports external USB joysticks. These joystick commands are sent over MAVLink.
The UAV
In this reference design, we are using Pixhawk 4 Orange Cube [3]. Information on how to hook up a pixhawk 4 with the Embedded Mesh Rider Radio can be found in the application note, "Integration with Pixhawk and QGC" available in the Doodle Labs Technical Library. The basic components relevant to the Mesh Rider Radio are shown in Fig. 4.
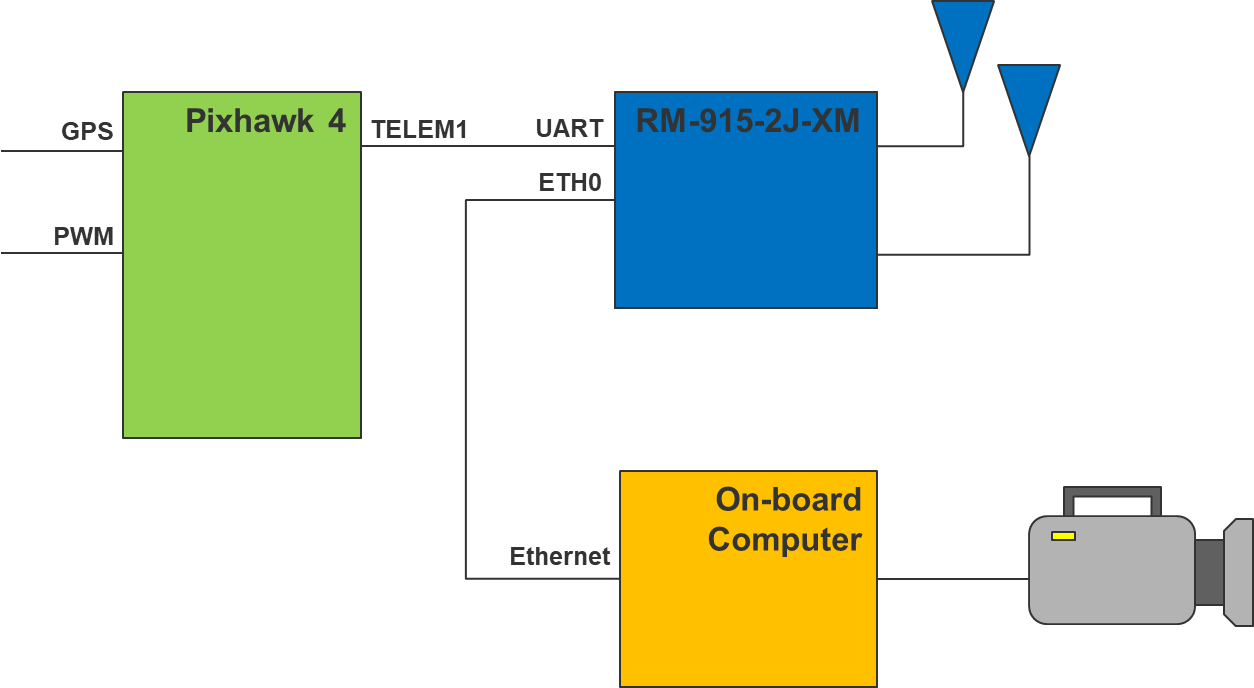
Fig. 4 UAV components connected to the Mesh Rider Radio
Software Configuration
Drone-side Mesh Rider Radio
The Mesh Rider Radio starts a UDP server at port 2000 with a baud rate of 57600 by default. Therefore, if the settings are acceptable, then there is no need to configure the Mesh Rider Radio at all. Fig. 3 shows a screenshot of the Serial Port configuration menu which can be accessed by navigating to Services -> Serial Configuration in the web GUI. By default, the Mesh Rider Radio's firewall is open on port 2000, but if the port is changed, then a new firewall option needs to be defined.
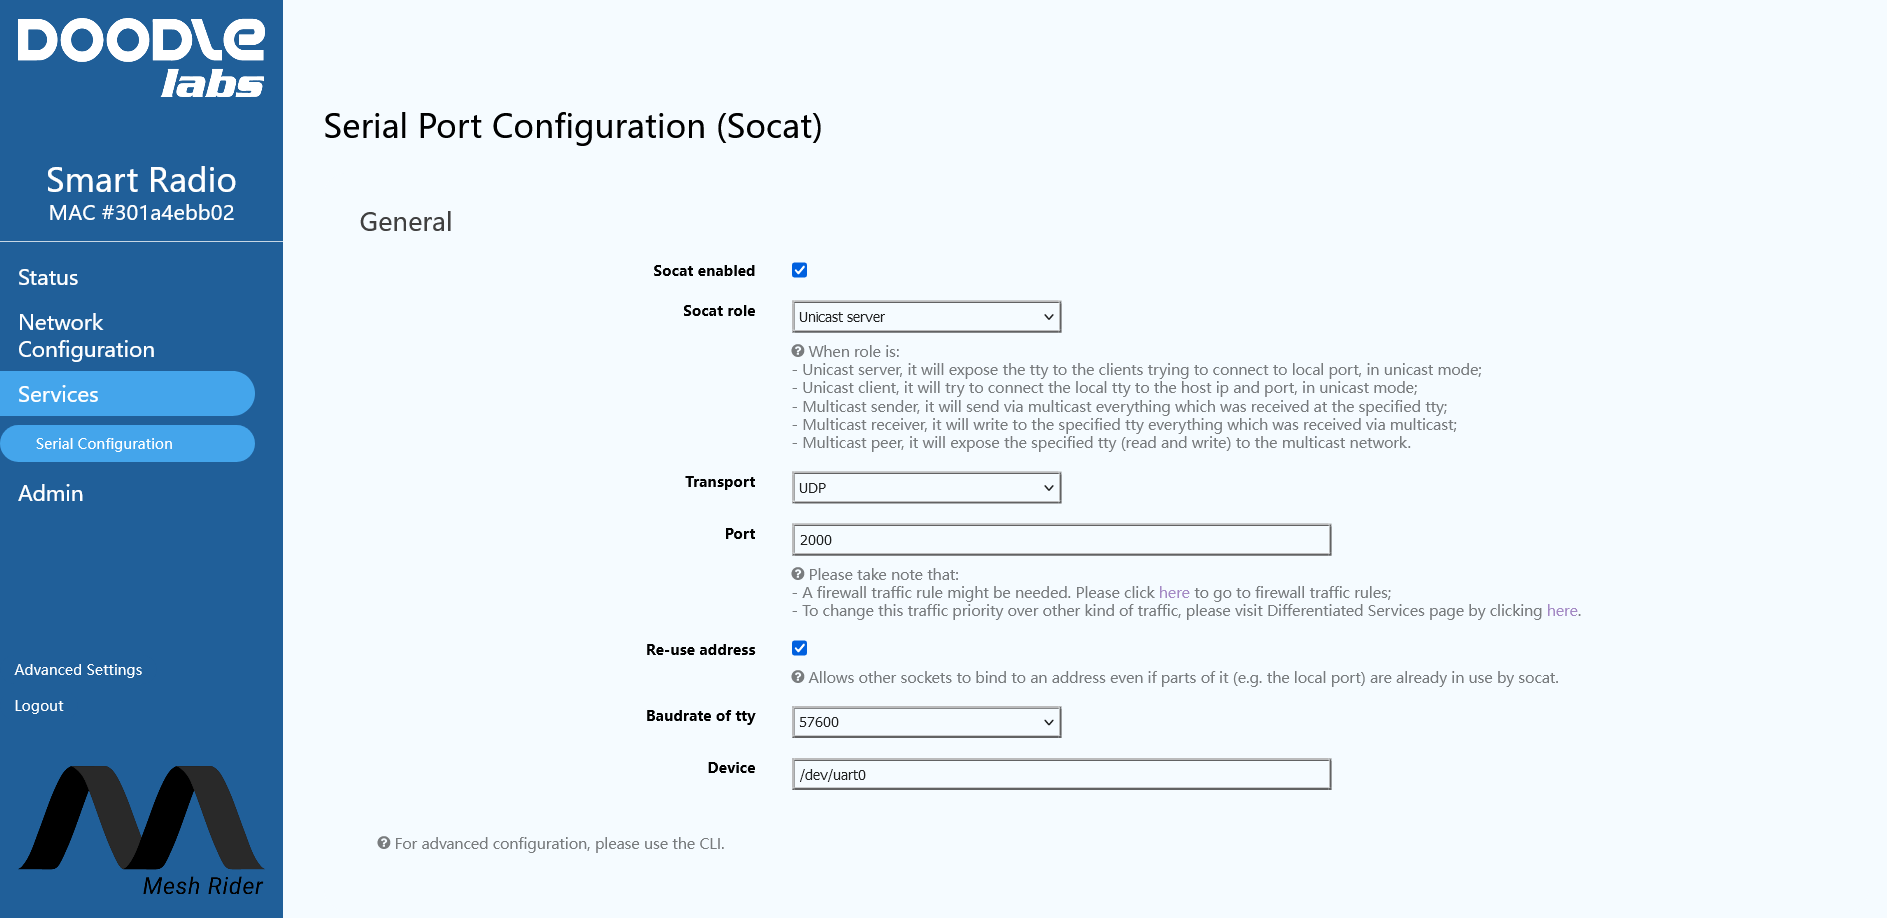
Fig. 5 Serial Port Configuration Menu
Aside from the Serial configuration, you should adjust the traffic prioritization settings. Navigate to Network Configuration -> Traffic Prioritization and make sure to use appropriate settings for the Voice Command & Control queue. If you are using the latest Mesh Rider firmware, then click Optimize Video Streaming. The radio will automatically identify high-bandwidth streams and route them to the Video queue. If the RSSI to a particular station is less than the "Video bad link threshold (dBm)", then the radio will drop a percentage of video packets going to that station defined by "Video bad link drop (percentage)".
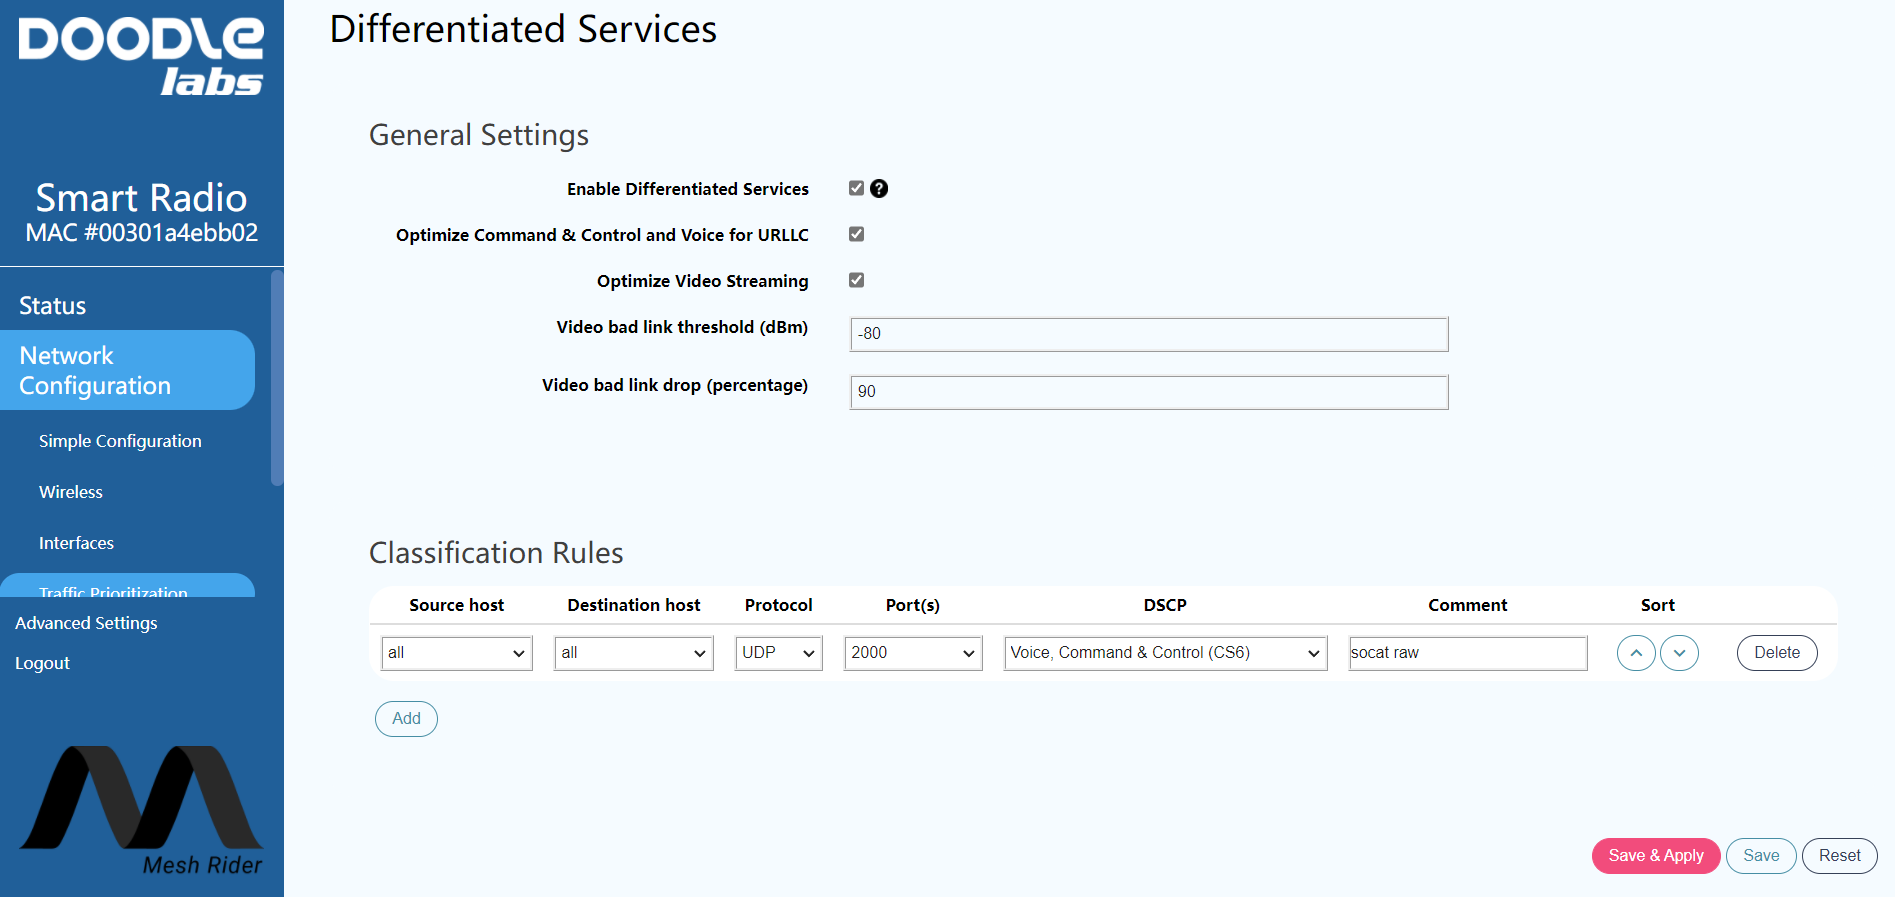
Fig. 6 Traffic Prioritization Menu
GCS-Side Mesh Rider Radio
For the GCS-side Mesh Rider Radio, we will use a Wearable Mesh Rider Radio which includes an integrated WiFi radio. The integrated WiFi radio starts an AP with SSID "DoodleLabsWiFi" and password "DoodleSmartRadio". As soon as the GCS-Side and Drone-side Mesh Rider Radios are powered, they should connect to one another. You should also configure the Traffic Prioritization settings in the same way that you did on the Drone-side Radio.
GCS
For this reference design, we will be using QGroundControl. We used a Samsung Galaxy Tab A for this reference design. Before starting QGroundControl, connect to the WiFi AP of the Mesh Rider Radio. You will need to use a static IP address for the GCS in the 10.223.0.0/16 subnet. An example configuration is shown in Fig. 7.
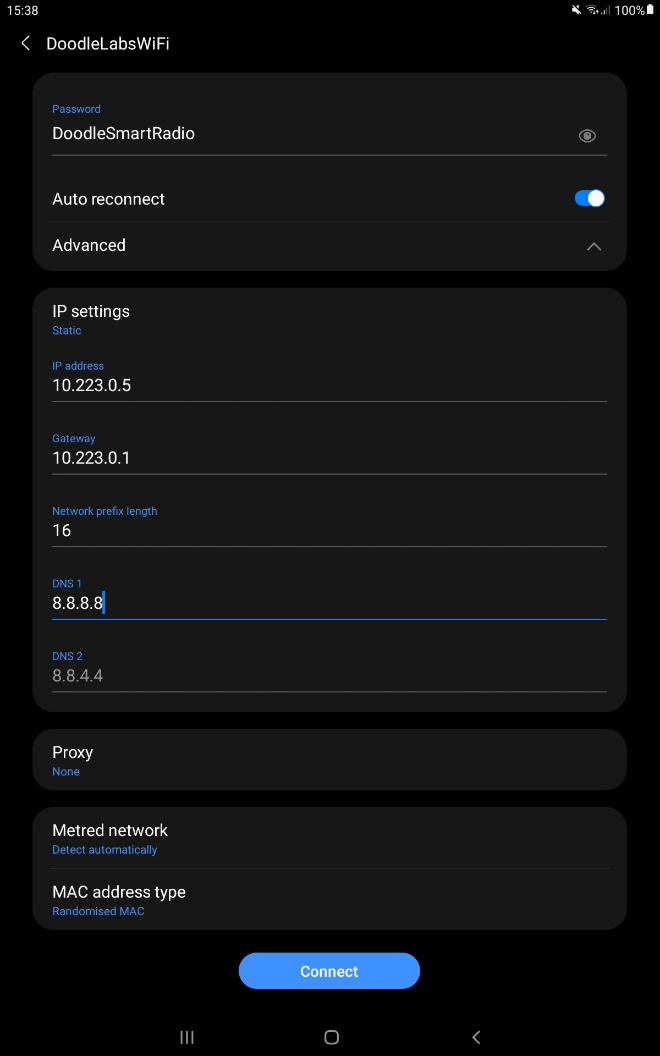
Fig. 7 GCS WiFi Configuration
Once you are connected to the Mesh Rider Radio, you should be able to ping any node on the network. Open QGroundControl and navigate to the Application Settings menu. In Fig. 6, we used the RTSP URL of our UAV.
When using Android as a GCS be aware that changing application windows can cause QGroundControl to disconnect.
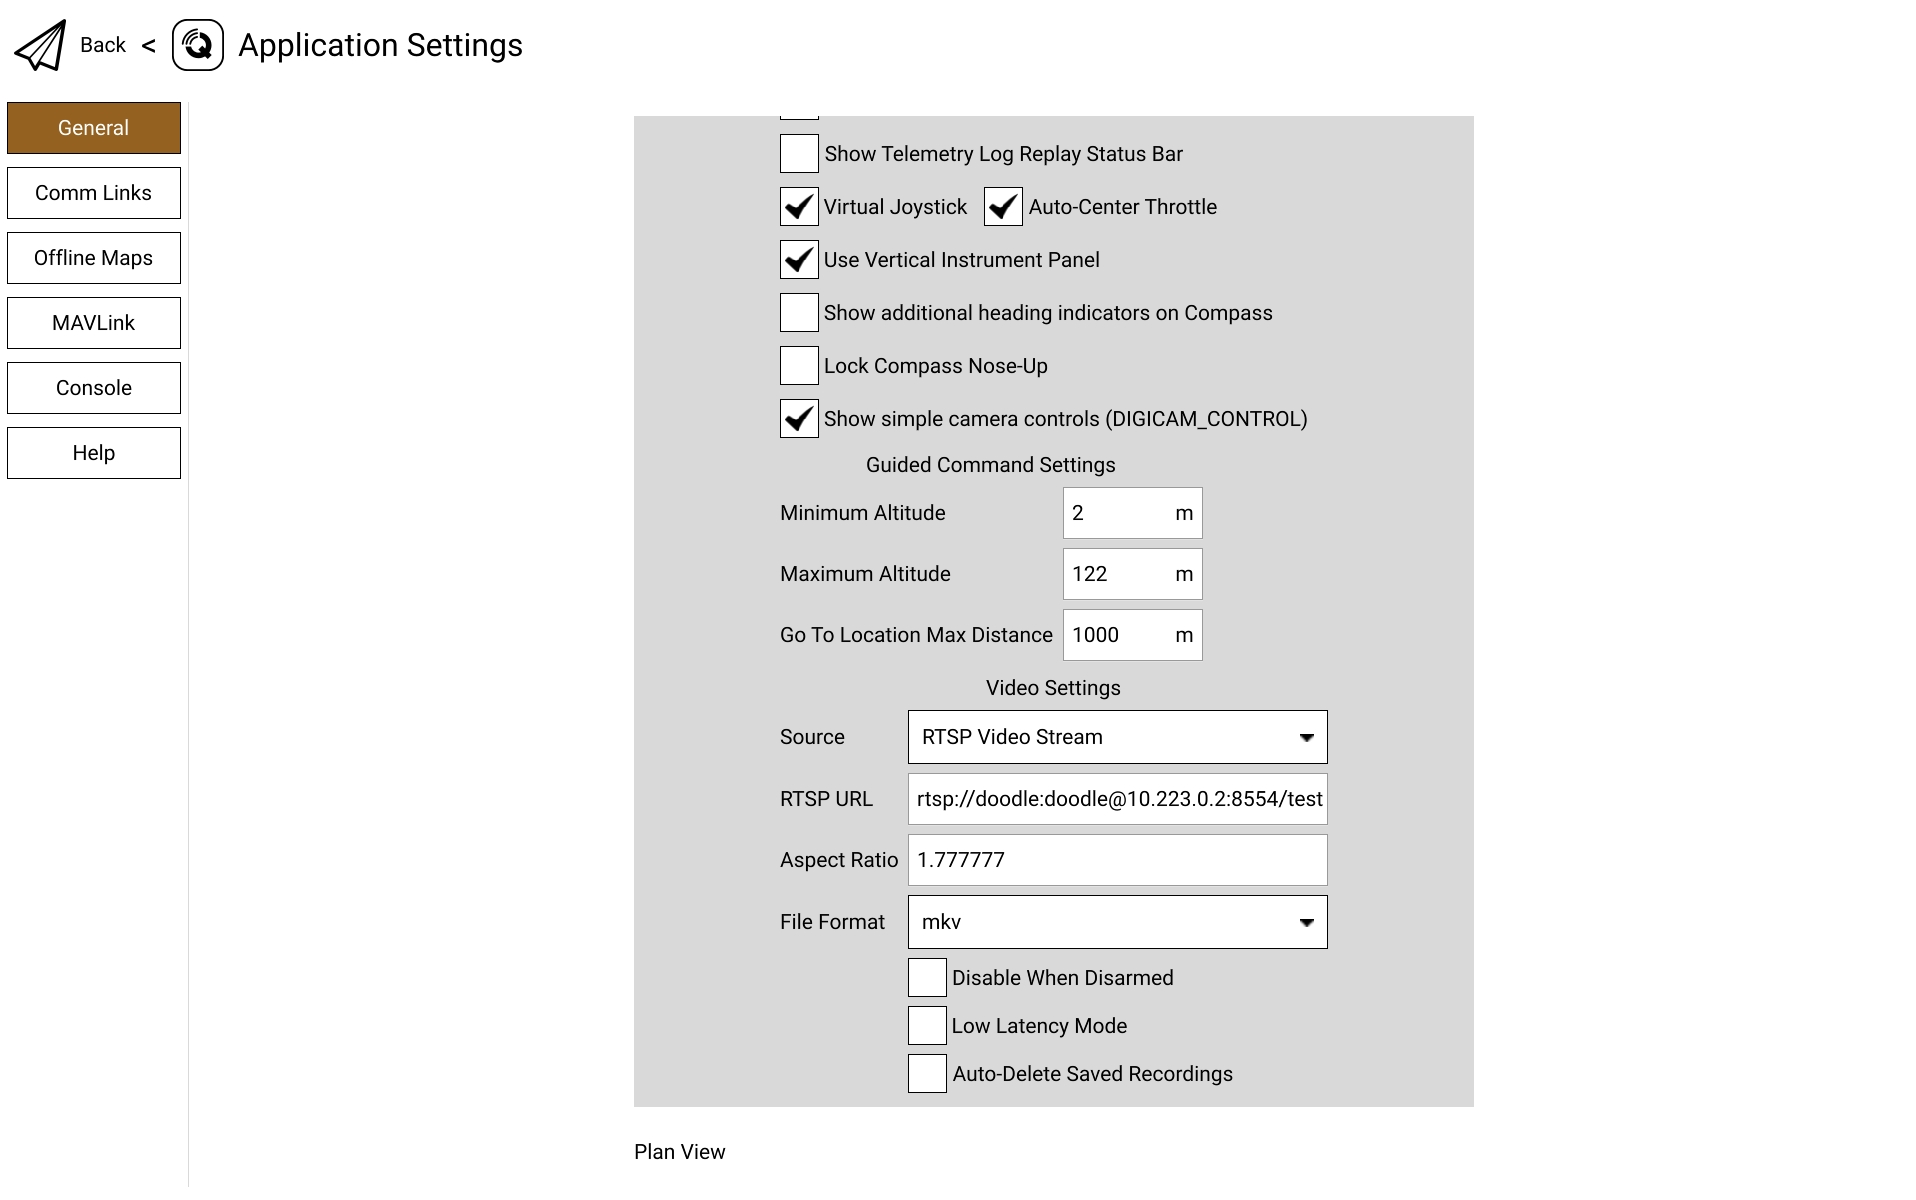
Fig. 8 QGroundControl Application Settings
Create a new connection to connect to the Socat UDP server on the UAV. The listening port is unimportant.
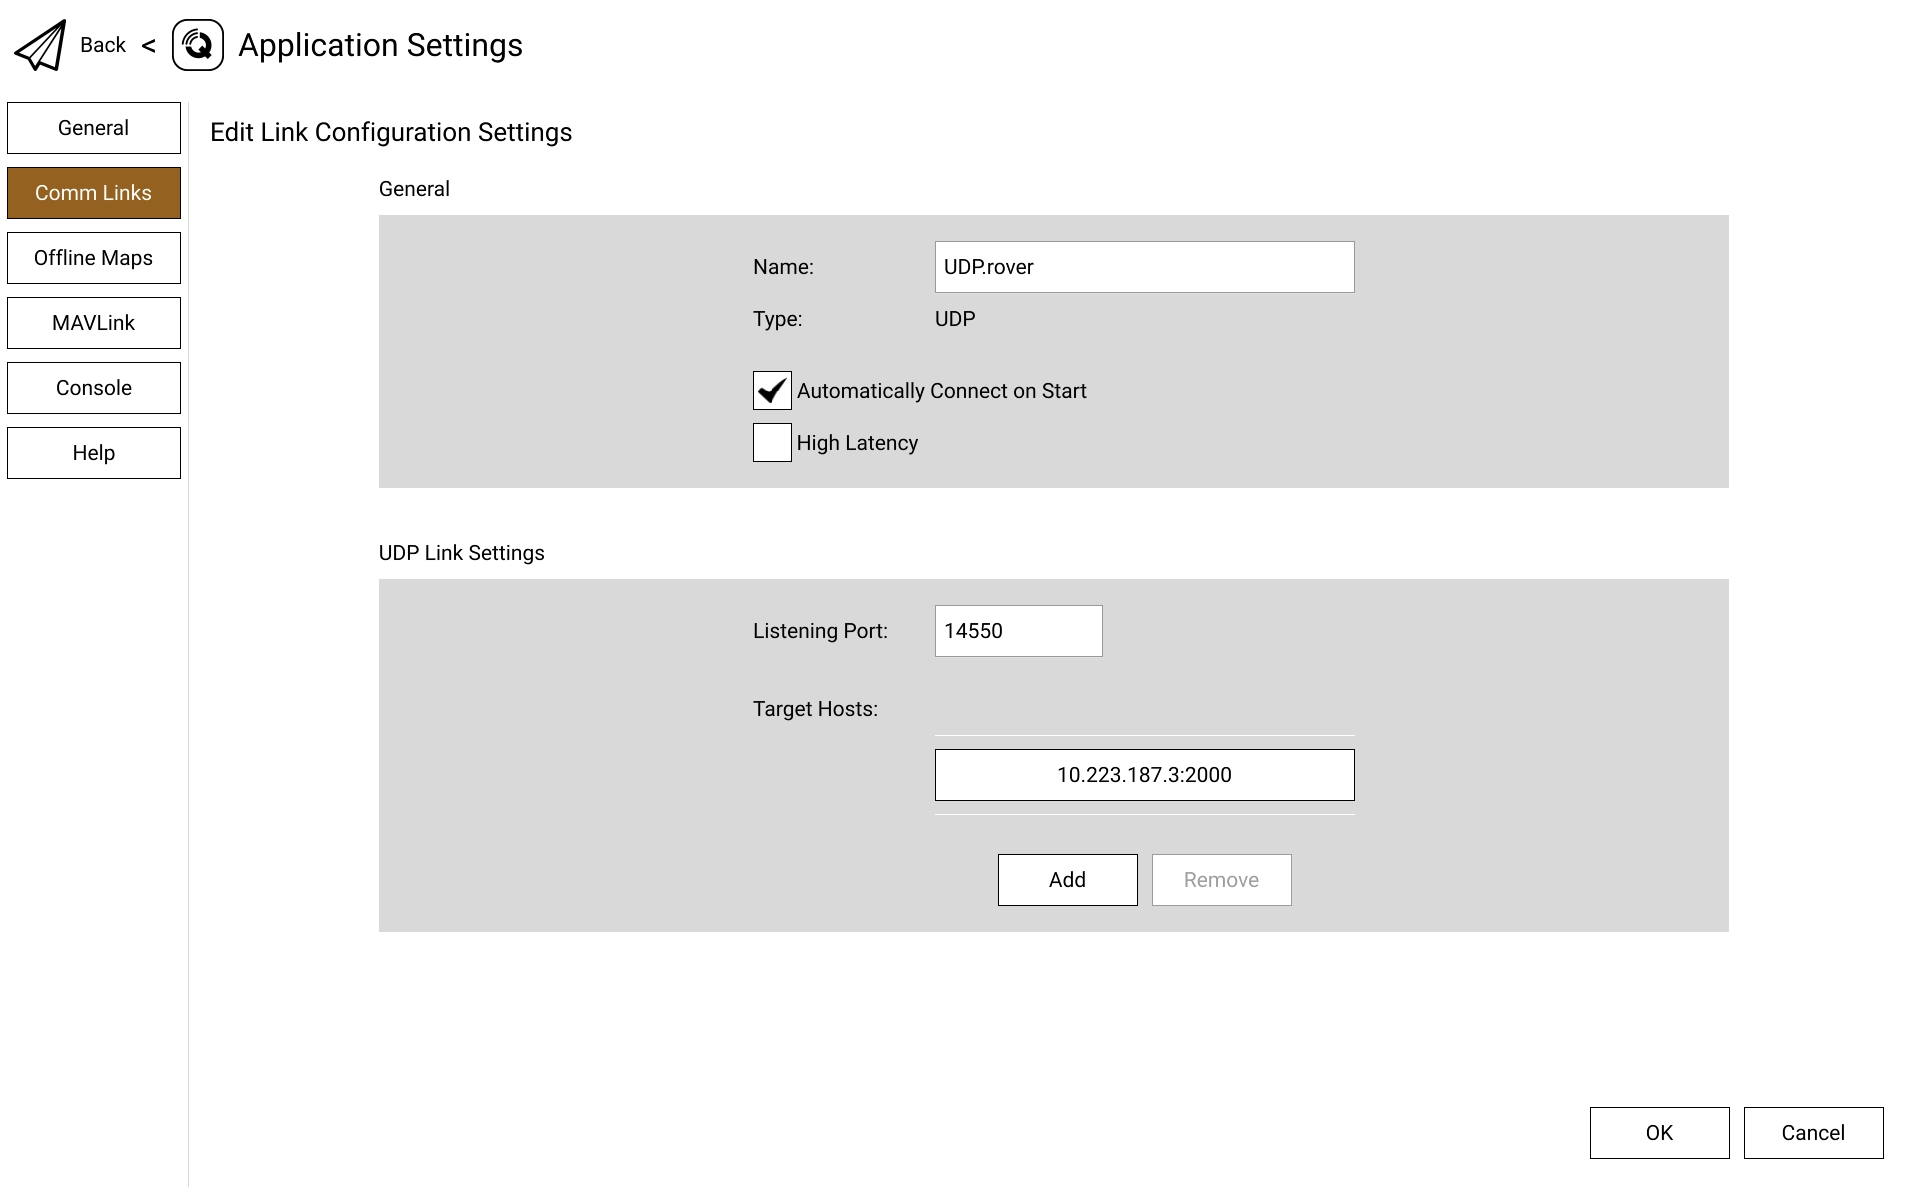
Fig. 9 QGroundControl Comm Links
After that, open up the Comm Links tab. At this point, navigate back to the main screen. QGroundControl will connect to the UAV.
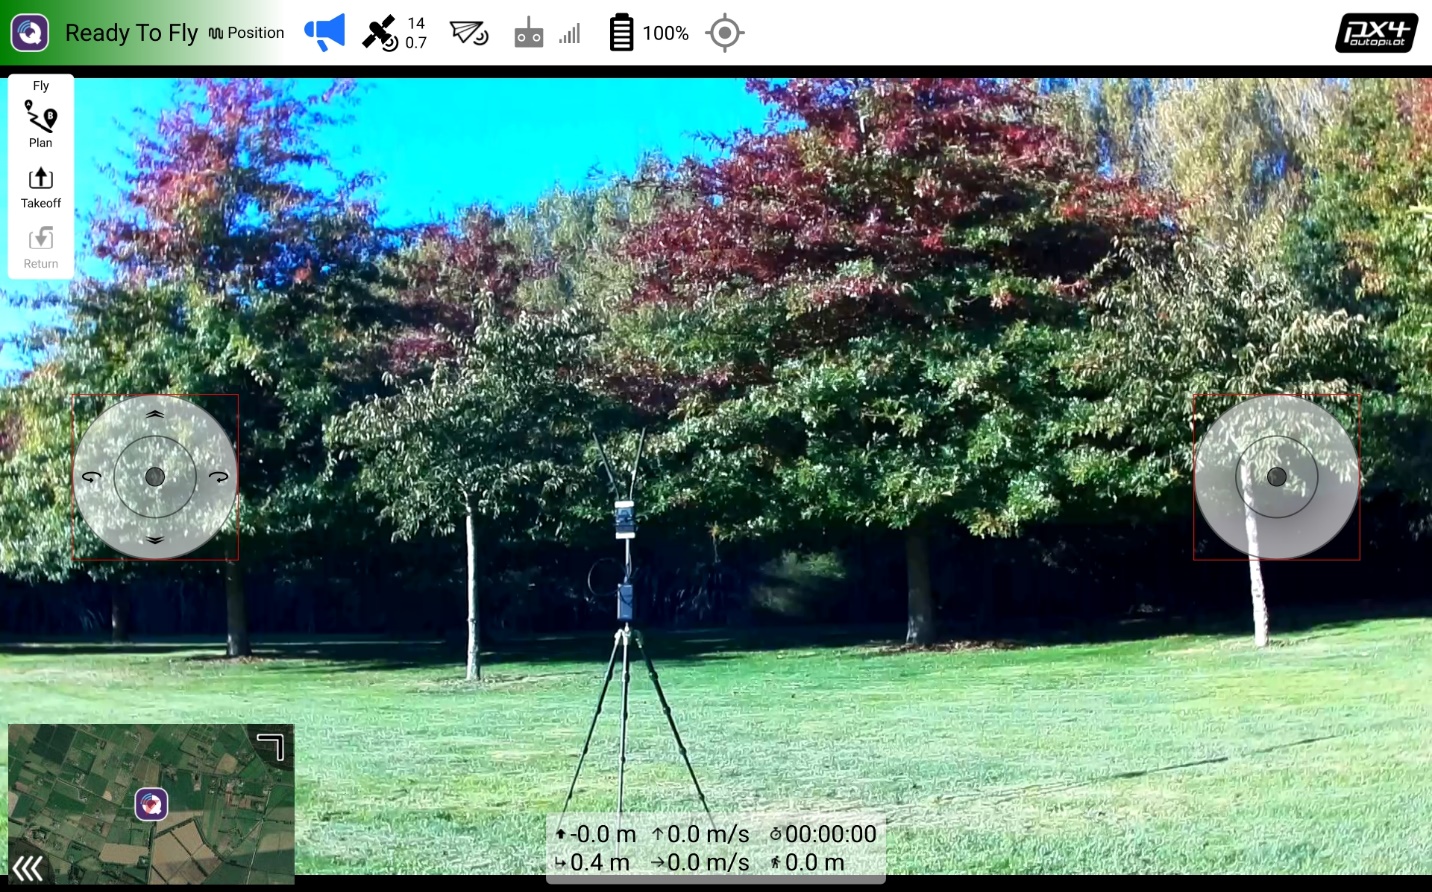
Fig. 10 QGroundControl Ready
Important Notes
Multiple Radios
There are three main links between the UAV and the GCS, telemetry, Video, and RC control. The Mesh Rider Radio can be used for all three links, and if necessary, the RC and Telemetry links can go over MAVLink.
Using multiple radios on a radio usually creates RF interference issues. You cannot operate two radios in the same band even if they are on different channels as this will seriously compromise the link performance of both radios. For example, an RC radio link at 2412 MHz cannot be used alongside the Mesh Rider Radio at 2462 MHz.
Mesh Rider Radio API
The APIs provided by the Mesh Rider Radio are described in the document, "Remote Management Guide for Mesh Rider Radio", which is available in our Technical Library.
Antennas
The Doodle Labs Mesh Rider Radios provide excellent communications range, however, we do recommend using the highest gain antennas which your application can support. This will provide the best link quality. Consult out guide, "Antenna Recommendations for UAS" in our Technical Library for more information.
References
- QGroundControl, http://qgroundcontrol.com/, 18-Jan-2022
- MAVLink Developer Guide, https://mavlink.io/en/, 18-Jan-2022
- Pixhawk, https://pixhawk.org/, 18-Jan-2022