Getting Started
For a deep look at all of the Mesh Rider Radio's configuration options, please consult the extensive guides and application notes available in our technical library. This guide is intended for first-time users of the Mesh Rider Radio to help get your network up and running quickly.
Overview
The Mesh Rider Radios do not require any configuration for initial bench testing. In fact, we recommend starting out with the factory defaults before attempting to fine tune the configuration.
The radios should automatically connect to one another out of the box.
The easiest way to picture the Mesh Rider Radio network is to consider the entire Mesh Rider Radio mesh network as a distributed layer-2 Ethernet switch. Plugging any device such as a laptop or an IP camera into the switch will automatically allow them to connect to one another. As such, the Mesh Rider Radios’ IP addresses do not matter unless you want to access the radios (for configuration or monitoring for example).
Hardware Setup
When you first get your Mesh Rider Radios, setup the radios following Fig. 1.
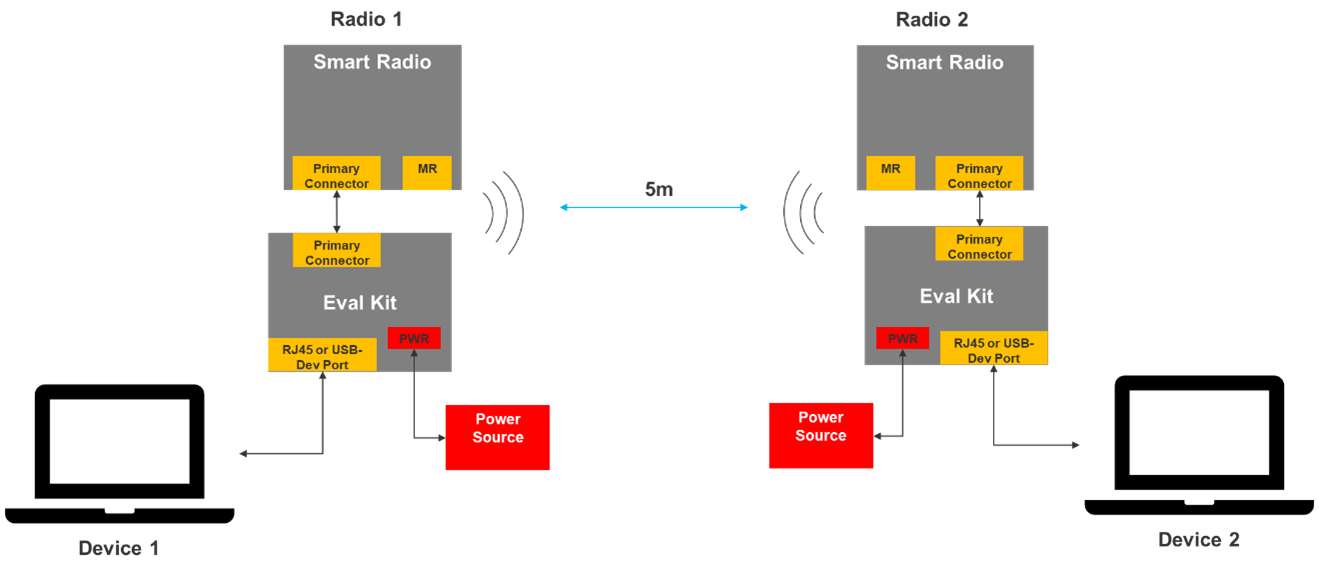
Fig. 1 Initial hardware setup
The exact setup will depend on which Mesh Rider Radio model you purchased.
- -2L models (Helix, miniOEM, nanoOEM)
- The power source must be 5-V and capable of at least 2.5A output (see the datasheet for details)
- You can use either the RJ45 or the USB-device port, but the USB-device port is faster.
- 2J models (Embedded)
- The power source should be between 6-V and 42-V (see the datasheet for details).
- There is no USB-device port, so use the RJ45 port.
- Make sure to connect both the primary and the secondary connector
- -2K models (Wearable and OEM)
- The Eval-Kit is not required. Connect your PC directly to the port labelled USB on the Mesh Rider Radio.
- The power source should be a USB-PD compliant source with at least 20-W output. Make sure to use the USB-C port and not a USB-A port.
We recommend keeping the radios at least 5m apart for your initial evaluation. This will prevent the receivers from saturating. In newer versions of the Mesh Rider Radio firmware, transmit-power control (TPC) is enabled by default which will allow radios to get closer together.
Host Machine Setup
Once you have your hardware set up, you need to set up your PCs (Device 1 and Device 2 in Fig. 1). By default, the Mesh Rider Radios act like a distributed Ethernet Switch, and therefore, they are not involved in IP addressing and do not run a DHCP server (this can be enabled if necessary). When you first setup your PCs, you will need to assign them static IP addresses. Assigning addresses in the 10.223.0.0/16 subnet will allow the PCs to access the Mesh Rider Radios themselves. The way to assign an IP address varies from system to system (Windows, MAC, Ubuntu etc). For a Windows 10 system, find the Network Connections folder in Control Panel. After plugging in the Mesh Rider Radio, you should see a new adapter come up like in Fig. 2.
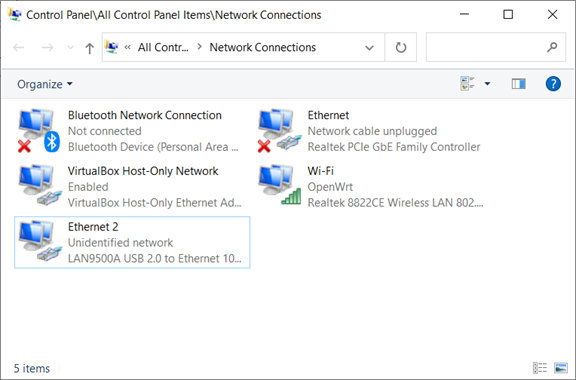
Fig. 2 Windows host setup 1
Right-click on the new adapter, and scroll down to the Internet Protocol Version 4 item. See Fig. 3.
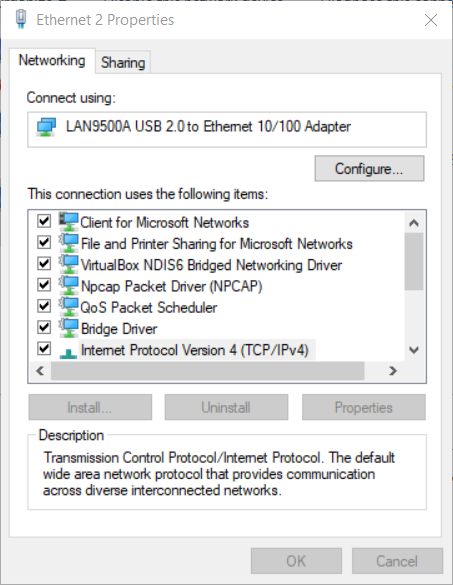
Fig. 3 Windows host setup 2
Click Properties and change the IP address to the 10.223.0.0/16 subnet. An example is shown in Fig. 4. Assign unique IP addresses to the two PCs.
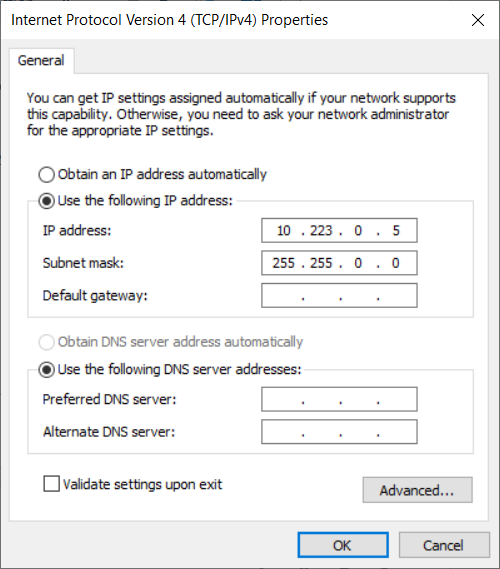
Fig. 4 Windows host setup 3
Radio IP Addressing
There are three IP addresses defined by default. These can be modified if necessary.
- A static IP address in the
10.223.0.0/16subnet. This IP address differs from device to device and can be used for remote configuration or sending data to or from the Mesh Rider Radio. The IP address can be calculated from the MAC address. If the IP address is 10.223.x.y and the MAC address is 00:30:1A:4E:A4:3E, the x is equal to the decimal value of 0xA4, or 164, and y is equal to the decimal value of 0x3E, or 62. The full IP address is therefore 10.223.164.62/16. On newer devices, this IP address is printed on the label. - A DHCP client. This is a dynamic IP address which is automatically assigned when there is a DHCP server on the network.
- A static IP address at 192.168.153.1/24. This is a fixed IP address which is the same for all radios. This IP address is designed to be used during initial configuration only and should never be used when more than one radio is on the network.
If you are unsure of the IP address on the 10.223.0.0/16 subnet, then the best option is:
- First change the IP address of your host system to 192.168.153.10/24 (any valid IP address in the 192.168.153.0/24 subnet not equal to 192.168.153.1 will work). The method to do so varies depending on the OS and whether you are using the WiFi interface, or the USB device interface. If you are connecting over WiFi for example, then you probably need to have your devices associated with SmartRadioWiFi before changing the IP address.
- Next run a command on the Mesh Rider Radio over SSH to print out the IP address on the 10.223.0.0/16 subnet.
user@host-pc:~$ ssh -q -o stricthostkeychecking=no root@192.168.153.1 'ip addr | grep 10.223'
inet 10.223.170.187/16 brd 10.223.255.255 scope global br-wan
Once you have the 10.223.0.0/16 IP address, you can change your host system's network configuration to use a static IP address on this subnet.
IP Advertisement
The radio runs an IP advertiser daemon which listens for UDP broadcast packets on port 11111 with the message "Hello" and replies with a list of the IP addresses on br-wan as well as the interface on which the message was received. This can be used to quickly identify all nodes on the network, as well as which one is local. To test it, run the following command on a Linux system with Socat installed (response shown)
user@host-pc:~$ echo "Hello" | socat - udp-datagram:10.223.255.255:11111,broadcast,sp=5000
{"ingress":["bat0"],"IPaddr":["10.223.187.2/16","192.168.153.1/24","192.168.0.136/24","fe80::230:1aff:fe4e:aa02/64"]}
Gateway Modes
There are two gateway modes defined in the simpleconfig menu, WDS AP with gateway, and Mesh with gateway. In these modes, a DHCP server runs on the Mesh Rider interface at 10.222.1.1/16, and the 192.168.153.1/24 fallback IP address is disabled.
Additionally, for Wearable Mesh Rider Radios, the WiFi radio can connect to a WiFi hotspot and route connections from the Mesh Rider network to the internet. In this case, the Wearable radio will become an internet gateway with an IP address 192.168.2.1/24, and it will start a DHCP server.
Radio Access
At this point, the radios should be connected to your PCs, and you can start using the network. You can try pinging between the two PCs. If you want to access the radios, open up a web browser and navigate to the IP address of the radio. You may be presented with a warning regarding the authentication certificate, but this can be safely ignored as the Mesh Rider Radio uses a self-signed certificate. By default, there is no password on the Mesh Rider Radio. After logging in, you will be presented with the Simple Configuration page (October 2022 firmware and later. Otherwise, navigate to Network -> Simple Configuration).
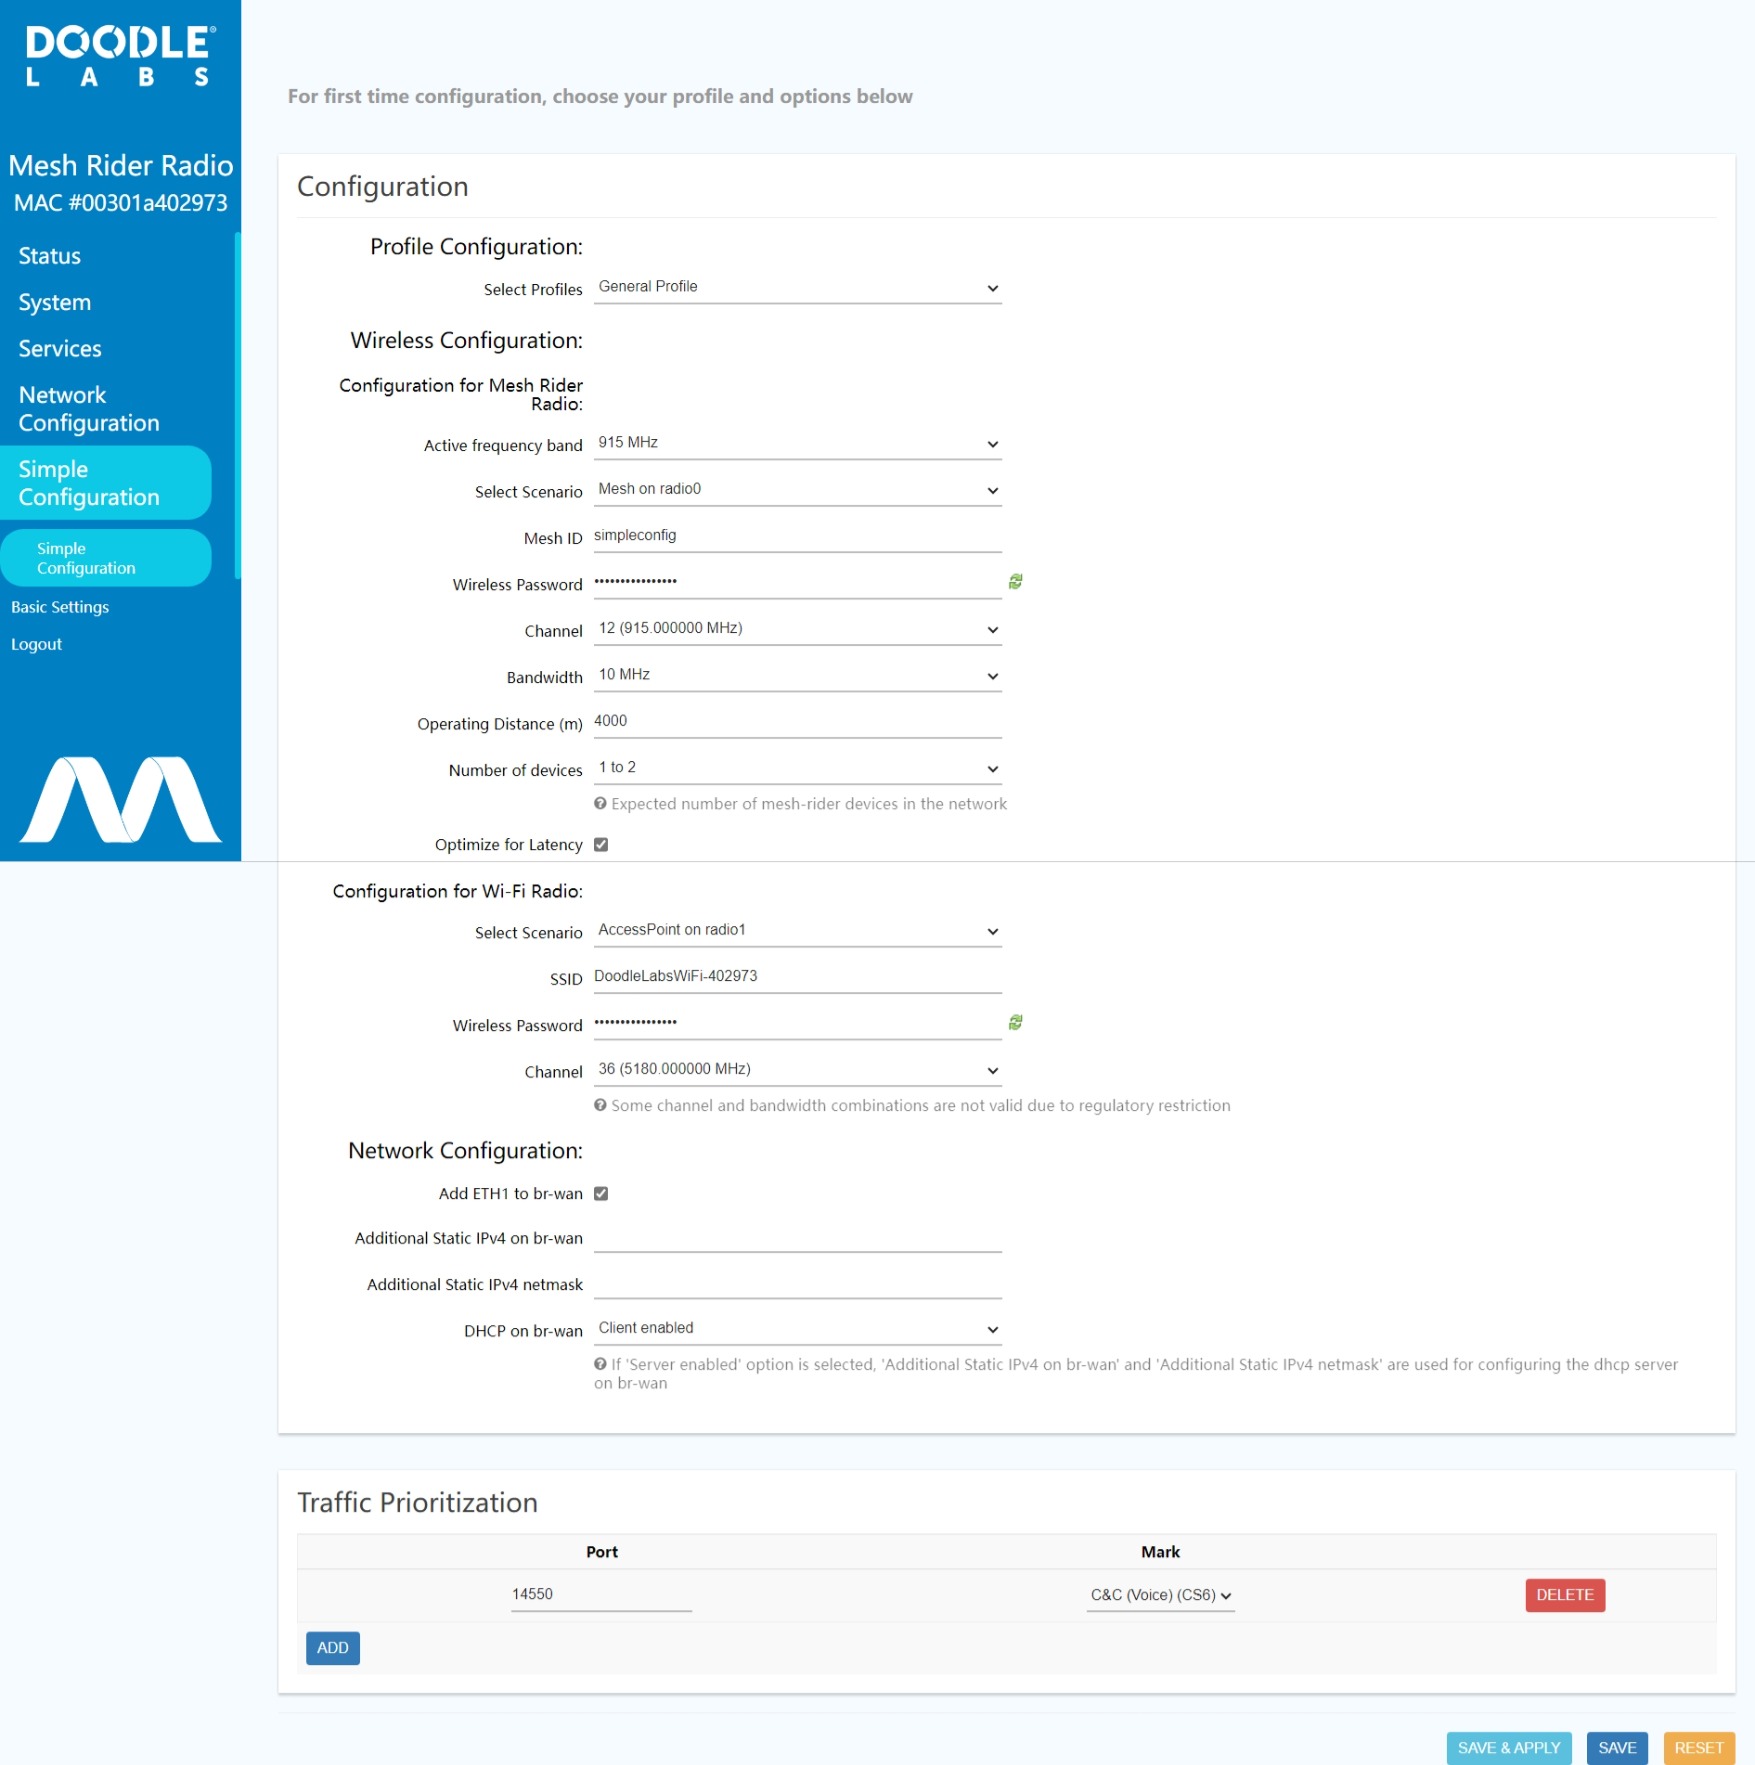
Radio Configuration using Simple Configuration
The Simple Configuration menu is essentially a setup wizard for the Mesh Rider Radio. It presents the user with a set of commonly configured options and applies good defaults. For information on different networking modes, see Supported Networking Modes section in the Technical Library.
After choosing your preferred Simple Configuration setup, click Save & Apply. The Simple Configuration Menu sets up several different configuration sections on the radio in one operation, and it can take a minute or so. This is typically a one-time setup, and modifying individual parameters should be done in the Advanced Settings menus.