Remote Management Guide for Mesh Rider Radio
Introduction
The Mesh Rider Radio runs the Mesh Rider OS. It is a customized version of Openwrt with enhancements useful for applications requiring low-latency command-and-control transmission and high-throughput video - e.g. UAV and robotics.
The purpose of this guide is to aide a user in remotely configuring Mesh Rider Radio settings. There are three primary ways to configure the Mesh Rider Radio. All of these interfaces can be accessed either locally (over Ethernet/USB) or remotely (over the wireless link).
- The Web GUI
- SSH
- The JSON-RPC API
- MQTT
Each of these interfaces serves a different purpose. The Web GUI is designed for initial configuration. For example, when you first start using the device, during bench testing.
SSH access is enabled for advanced system configuration and status monitoring. It provides root access to the underlying Linux system and is a very powerful way to access the system. Typically, equipment manufacturers should not allow SSH access to the end users of the radios. SSH can be very fast when using multiplexing.
The JSON-RPC API is designed for integration into customer software. As with SSH access, it potentially provides complete access to the underlying Linux system, however access permissions can also be tailored to the equipment manufacturer’s requirements so that end-users cannot access the nuts and bolts of the radios system.
MQTT is an alternative to the JSON-RPC API which is ubiquitous in IoT applications. Only user-defined messages can be sent using MQTT. MQTT can be very fast if encryption is turned off.
A summary of the differences between the command-line APIs is shown in Table 1.
Table 1: Comparison of Mesh Rider Radio APIs
| SSH | JSON-RPC | MQTT | |
|---|---|---|---|
| Network Model | P2P, Client-server | P2P, Client-server | Centrally Managed |
| Primary Usage | Debugging | Software Integration | IoT, simple messaging |
| Access | Full | User-Defined | User-Defined |
| Command Set | All | ubus only | User-defined messaging |
| Security | Required | Required | Optional |
| Latency | Fast with multiplexing (10s of milliseconds) | Fast (10s of milliseconds) | + Slow with TLS (~2s) + Fast without (10s of milliseconds) |
End users will typically never use any of these APIs directly. In fact, they should not even have the password to access the radios. Instead, they use application software such as ground-control-station (GCS) software which uses the JSON-RPC API to talk to the radio and relay information to the user.
The remainder of the main content of this document discusses how to run commands in the CLI.
The Web GUI
The Web GUI can be accessed in any web browser at https://<IP ADDRESS> (port 443). Note that the web browser uses a self-signed certificate. This means that connection to the web browser is encrypted, but not authenticated. The first time you access the Mesh Rider Radio from a new browser, you will get an SSL certificate warning. It is okay to ignore the warning and proceed.
SSH
SSH or Secure Shell is a way to securely login to the Mesh Rider Radio. The easiest way to do so is to open up a command prompt (Windows) or terminal (Linux), and type
ssh root@<IP ADDRESS>
Where <IP ADDRESS> is the IP address of the Mesh Rider Radio. There are numerous configuration options that your SSH client supports, such as public key authentication, and quiet output and you are encouraged to research them.
Note that your SSH client keeps a list of known hosts, and after a firmware upgrade, you may need to remove the Mesh Rider Radio from the known hosts list. You can do so by running
ssh-keygen -R <IP ADDRESS>
Sending Remote Commands
You can remotely execute a command via SSH to obtain network information from the node. For example,
ssh root@<IP ADDRESS> "iw wlan0 info"
Interface wlan0
    ifindex 13
    wdev 0x7
    addr 00:30:1a:4e:86:46
    type mesh point
    wiphy 0
    channel 12 (915 MHz), width: 20 MHz, center1: 915 MHz
    txpower 32.00 dBm
Speeding up the Connection
If your SSH client supports Multiplexing (OpenSSH for example), then it is a good way to improve the connection speed. Multiplexing allows you to send multiple commands over a single SSH connection. Information about the setup can be found here:
https://en.wikibooks.org/wiki/OpenSSH/Cookbook/Multiplexing
As an example, modify your SSH config file (usually ~/.ssh/config) with the following settings
Host *
    IdentitiesOnly yes
    ControlPersist yes
    COntrolMaster auto
    ControlPath ~/.ssh/%r@%h:%p
Create the file if it doesn't exist.
The JSON-RPC API
The JSON-RPC API is normally preferred when integrating radio access into custom software. In order to enable the JSON-RPC API, navigate to
https://<IP ADDRESS>/cgi-bin/luci/admin/services/rpcd
in your web browser. Fig. 1 shows the JSON-RPC API web configuration page.
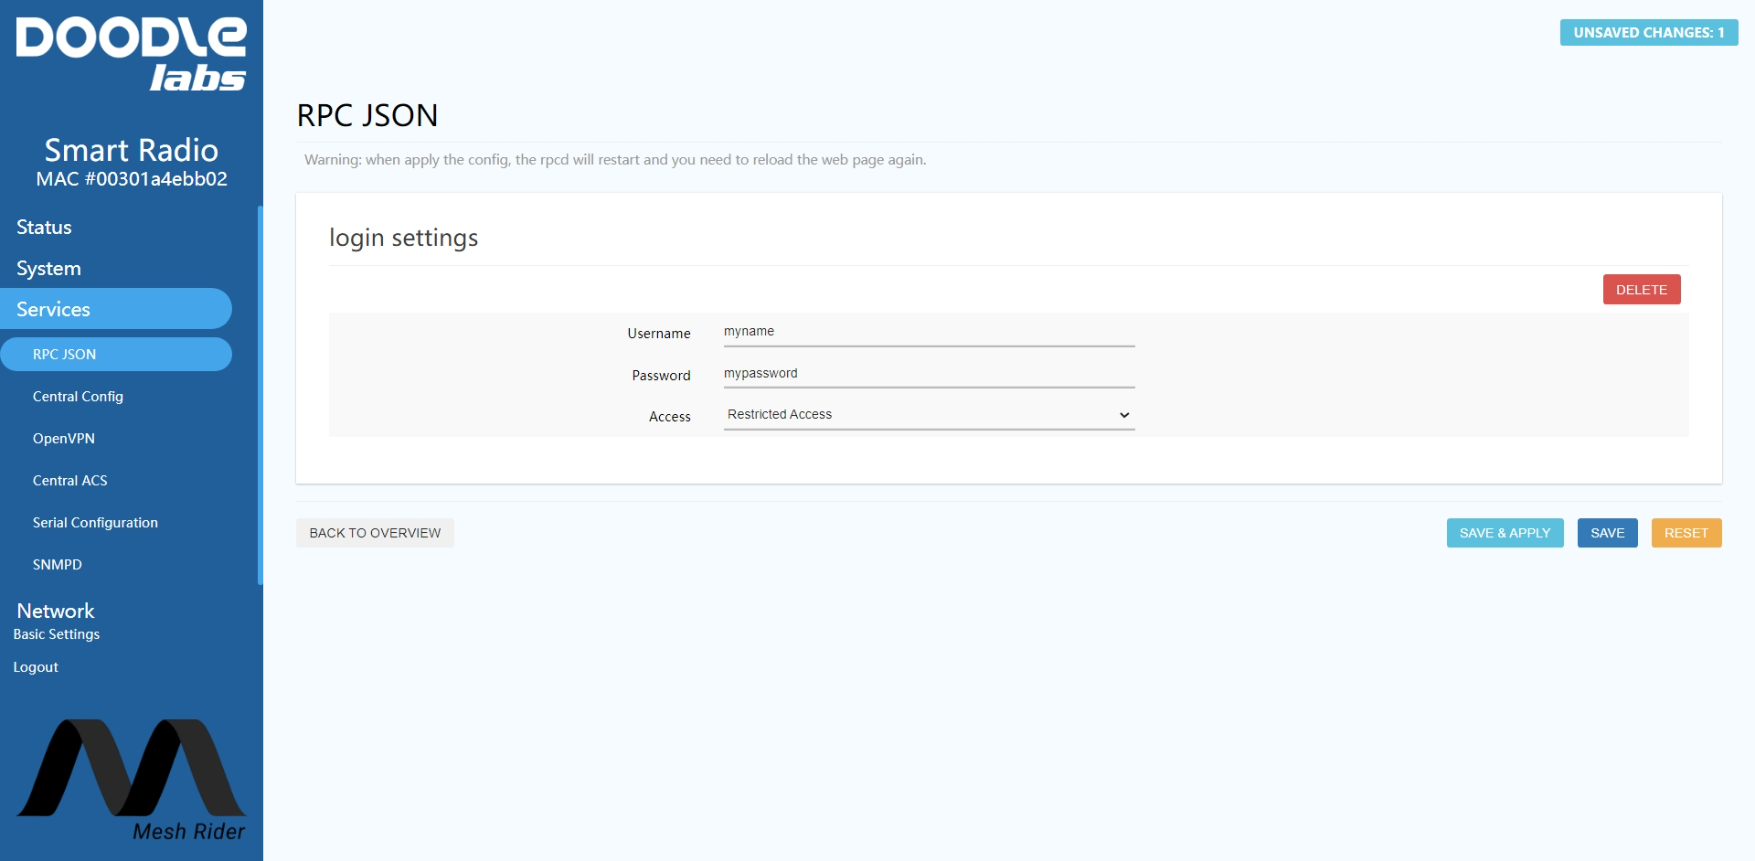
Fig. 1 JSON RPC API Configuration Page
Click Add to configure the API. Choosing Restricted Access opens up the API for a limited set of commands which we will detail later. You can also choose Full Access which allows unrestricted access to the Linux filesystem, and Custom Access, if you know how to customize the JSON RPC API. We recommend choosing Restricted Access if you are not sure.
The default username and password for the JSON-RPC API is root, DoodleSmartRadio.
Restricting Access
Only UBUS commands can be executed over the JSON-RPC API. The commands which can be executed over the JSON-RPC API are configured in the file /usr/share/rpcd/acl.d/root.json. We suggest that you read the file to gain an understanding of how to control user access. A listing is shown below with Restricted Access applied.
root@smartradio:~# cat /usr/share/rpcd/acl.d/root.json
{
        "root": {
                "description": "user access role",
                "read": {
                        "ubus": {
                                "file": [ "exec", "read", "stat" ],
                                "iwinfo": [ "info" ],
                                "system": [ "reboot", "info" ],
                                "dhcp": [ "*" ],
                                "central-config" : [ "*" ],
                                "uci": [ "*" ]
                        },
                        "uci": [ "wireless", "network" ],
                        "file": {
                                "/usr/bin/free": [ "exec" ],
                                "/usr/bin/top -n1": [ "exec" ],
                                "/bin/dmesg": [ "exec" ],
                                "/sbin/logread": [ "exec" ],
                                "/usr/sbin/alfred *": [ "exec" ],
                                "/usr/sbin/batadv-vis *": [ "exec" ],
                                "/usr/sbin/batctl *": [ "exec" ],
                                "/usr/sbin/iw *": [ "exec" ],
                                "/etc/init.d/* start": [ "exec" ],
                                "/etc/init.d/* stop": [ "exec" ],
                                "/etc/init.d/* restart": [ "exec" ],
                                "/usr/bin/link-status.sh *": [ "exec" ],
                                "/tmp/run/pancake.txt": [ "read" ],
                                "/var/run/gps/*": [ "read" ],
                                "/tmp/status.json": [ "read" ],
                                "/tmp/longtermlog/status.json": [ "read" ]
                        }
                },
                "write": {
                        "ubus": {
                                "central-config" : [ "*" ],
                                "uci": [ "*" ]
                        },
                        "uci": [ "wireless", "network" ],
                        "file":{
                                "uci *": [ "exec" ]
                        }
                }
        }
}
Using the JSON-RPC API
To use API, you need to get a session ID and use it for subsequent requests. For example, you can try the following call,
USER=myusername
PASS=mypassword
curl -k https://<IP-ADDRESS>/ubus -d '
{
  "jsonrpc": "2.0",
  "id": 1,
  "method": "call",
  "params": [ "00000000000000000000000000000000", "session", "login", { "username": '\"$USER\"', "password": '\"$PASS\"'  } ]
}'
the -k option is required because the Mesh Rider Radio doesn’t use a third party certificate authority. An example of using JSON-RPC API for file access is shown below. Substitute <TOKEN> with the value returned above.
TOKEN=$1
curl -k https://<IP-ADDRESS>/ubus -d '
{
  "jsonrpc": "2.0",
  "id": 1,
  "method": "call",
  "params": [ '\"$TOKEN\"', "file", "read", { "path": "/tmp/status.json" } ]
}'
We recommend parsing data on your local machine rather than trying to parse it on the Mesh Rider Radio.
Using the JSON-RPC API requires knowledge of UBUS. Please read the section Running Commands in the CLI for more information.
Speeding up the connection
In the commands above, we ran the curl utility directly from the command prompt. The speed is limited when doing this because each curl command establishes a new session and closes it once the command is complete. A faster way to poll data is to open a session, send all of your commands, and the close the session when you are done. The listing below shows how this could be done using python3.
#!/usr/bin/python3

import requests
import json

IPADDR = "10.223.59.152"
USER = "root"
PW = "DoodleSmartRadio"

url = 'https://{}/ubus'.format(IPADDR)

# Create a session
session = requests.Session()

# JSON payload for login request
login_payload = {
    "jsonrpc": "2.0",
    "id": 1,
    "method": "call",
    "params": ["00000000000000000000000000000000", "session", "login", {"username": USER, "password": PW}]
}

# Send the login POST request
response = session.post(url, json=login_payload, verify=False)

# Parse the JSON response
data = json.loads(response.text)

# Extract the desired value (token)
token = data['result'][1]['ubus_rpc_session']

# Print the token
print("Token:", token)

# JSON payload for distance request
time_payload = {
    "jsonrpc": "2.0",
    "id": 1,
    "method": "call",
    "params": [ token, "file", "exec", { "command": "cat", "params": [ "/proc/uptime" ] } ]
}

# Send the distance POST request
response = session.post(url, json=time_payload, verify=False)

# Parse the JSON response
data = json.loads(response.text)

# Extract the desired value (distance)
radioTime = data['result'][1]['stdout']

# Print the distance
print("Radio Time:", radioTime)

# Repeat to show the speed
response = session.post(url, json=time_payload, verify=False)
data = json.loads(response.text)
radioTime = data['result'][1]['stdout']
print("Radio Time:", radioTime)

# Repeat again to show the speed
response = session.post(url, json=time_payload, verify=False)
data = json.loads(response.text)
radioTime = data['result'][1]['stdout']
print("Radio Time:", radioTime)

# Close the session
session.close()
MQTT
The Mesh Rider Radio has supported MQTT broker and client protocols since the February 2022 firmware release. MQTT uses a publish/subscribe model. Clients can publish messages to a topic, and all clients which are subscribed to that topic will receive the message. All communications are handled by a central broker.

Fig. 2 MQTT publish/subscribe model
The Mesh Rider Radio uses MQTT for it's Central Config utility, so the easiest way to start a broker is to simply set one of the radios as the primary node in the Central Config configuration page. Navigate to Services -> Central Config in the GUI and use the setup below.
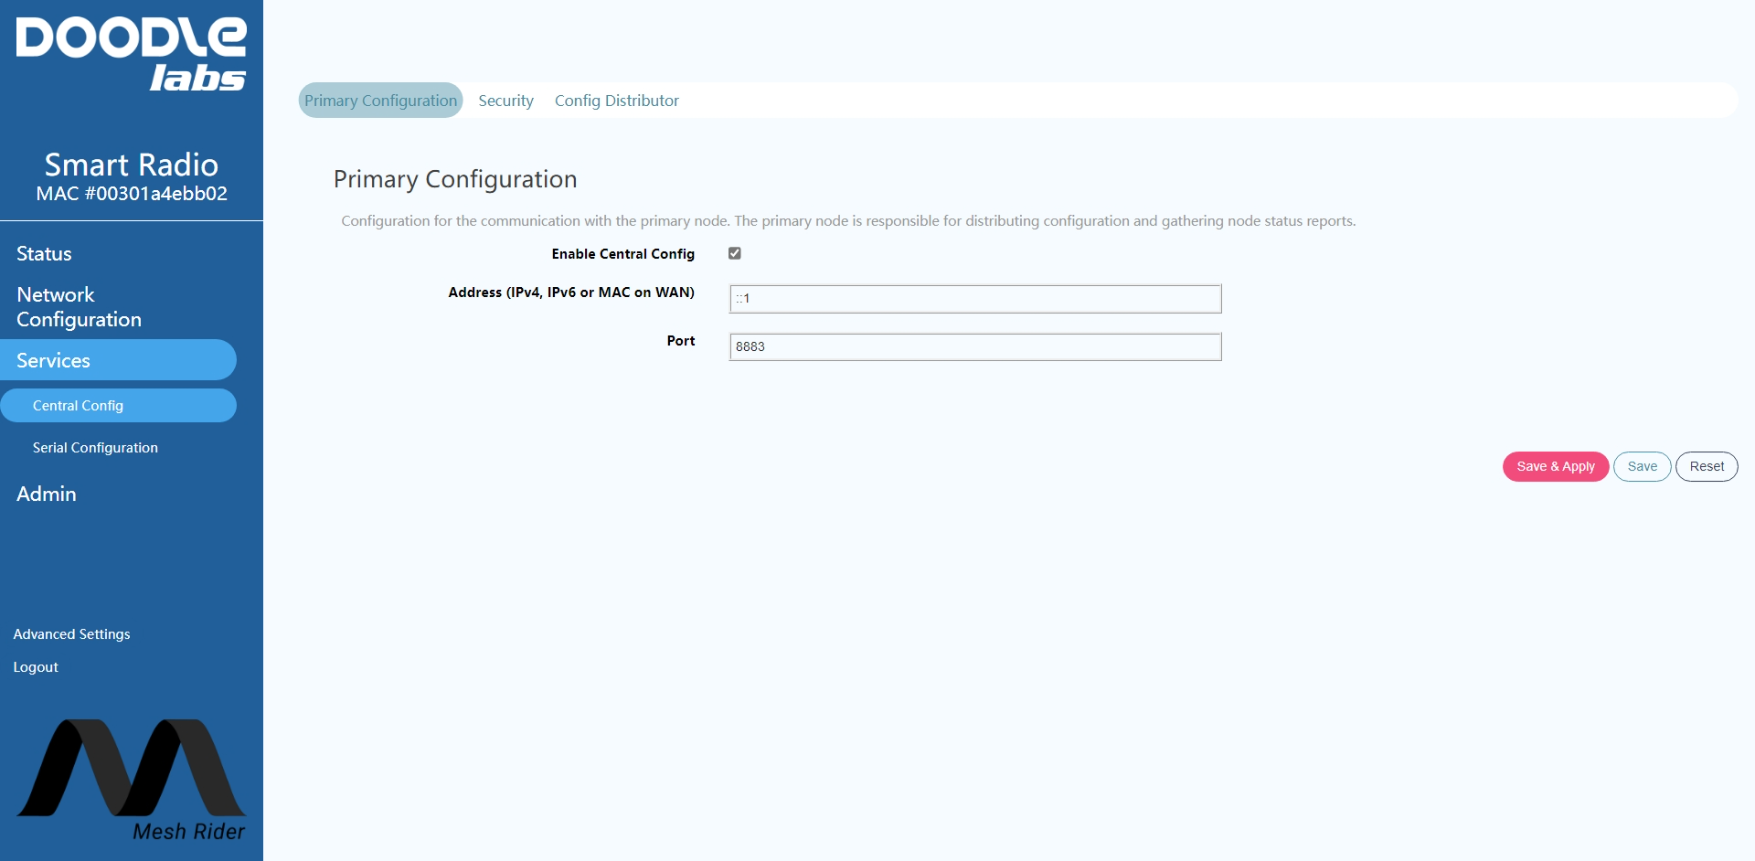
Fig. 3 Central Config setup
This radio will now run an MQTT broker. You can modify the security settings on the broker in the security tab. You can check that the broker is running by logging into the radio over SSH and running the following command
ssh root@<host IP>
ps w | grep mosquitto | grep -v grep
You can test out the following pub/sub commands from the Mesh Rider Radio itself.
Subscribe to the topic "mytopic"
mosquitto_sub -h <BROKER IP> -p 8883 -t "mytopic" --psk "0123456789abcdef" --psk-identity "doodlelabs"
Publish a message to the topic "mytopic"
mosquitto_pub -h <BROKER IP> -p 8883 -t "mytopic" --psk "0123456789abcdef" --psk-identity "doodlelabs" -m 'Hello'
For details on common CLI commands, or if you want to create program that starts automatically on boot, see our command-line guide.
Speeding up MQTT
The speed at which MQTT can send commands is limited by the TLS handshaking required for every message sent. You can also run an MQTT broker without TLS security by simply running
mosquitto
over the CLI. You can also create a start-up script to do this automatically on boot. The insecure MQTT broker listens on port 1883, so you will need to open the firewall on port 1883 for the broker to receive messages. With TLS disabled, the mosquitto_pub/sub commands are the same except the --psk and --psk-identity arguments are not required.
As with SSH and the JSON-RPC API, you can also explore different MQTT library implementations for ways to send multiple commands in a single session.