CBRS Configuration and Testing
Introduction
This guide only applies to Citizens Broadband Radio Service (CBRS) models, which operate in the 3550-3700 MHz CBRS frequency band. See our RM-3625-2J-X datasheet for more information on CBRS.
General CBRS Information
CBRS devices are broadly grouped into CBSDs (Citizens Broadband Service Device) and EUDs (End User Device). CBSDs must maintain a connection to a Spectrum Access System (SAS) over the internet, and must provide their GPS coordinates along with other important information to the SAS. Our radios are tested with Google SAS. More information is available here.
CBSDs are categorized as Class A or Class B. Class A CBSDs are designed for shorter-range deployments with limitations on the maximum EIRP and antenna height, while Class B CBSDs technically support much greater range through higher EIRP and height limits, but must be installed by a Certified Professional Installer (CPI). CPI certification can be obtained through Google. A full set of CBRS regulations is detailed here.
Note that Class A devices which are not installed by a CPI must include an internal GPS to send the CBSD's location to the SAS.
Supported Networking Modes
Doodle Labs CBRS Mesh Rider Radios support simple star networks with a CBSD acting as an Access Point (AP), and many EUDs acting as clients (Fig. 1). In addition, we support a mesh mode where several CBSDs can be chained together over a mesh backbone, each serving multiple EUDs.
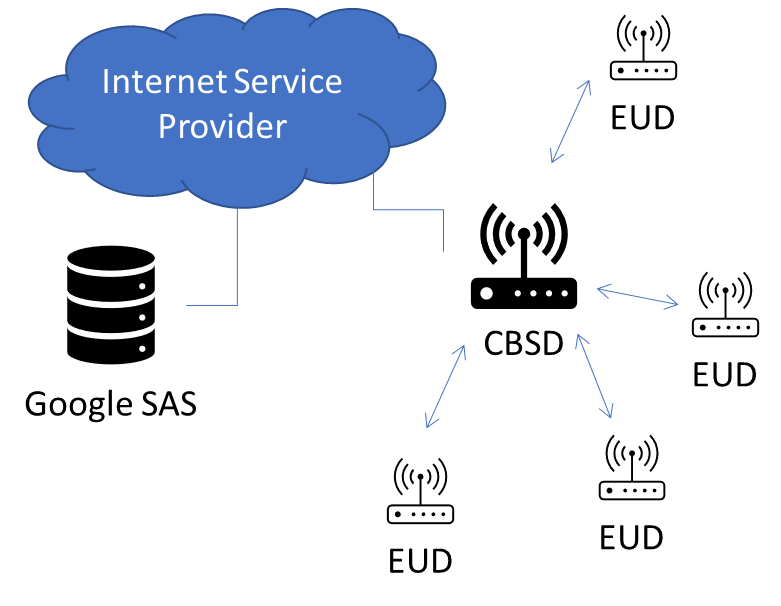
Fig. 1 CBRS Simple Star Network

Fig. 2 CBRS Mesh Network
Hardware Setup
Set up your hardware as in Fig. 3. See our Embedded and External Design-in-Docs pages for information on how to power and hook-up the radios.
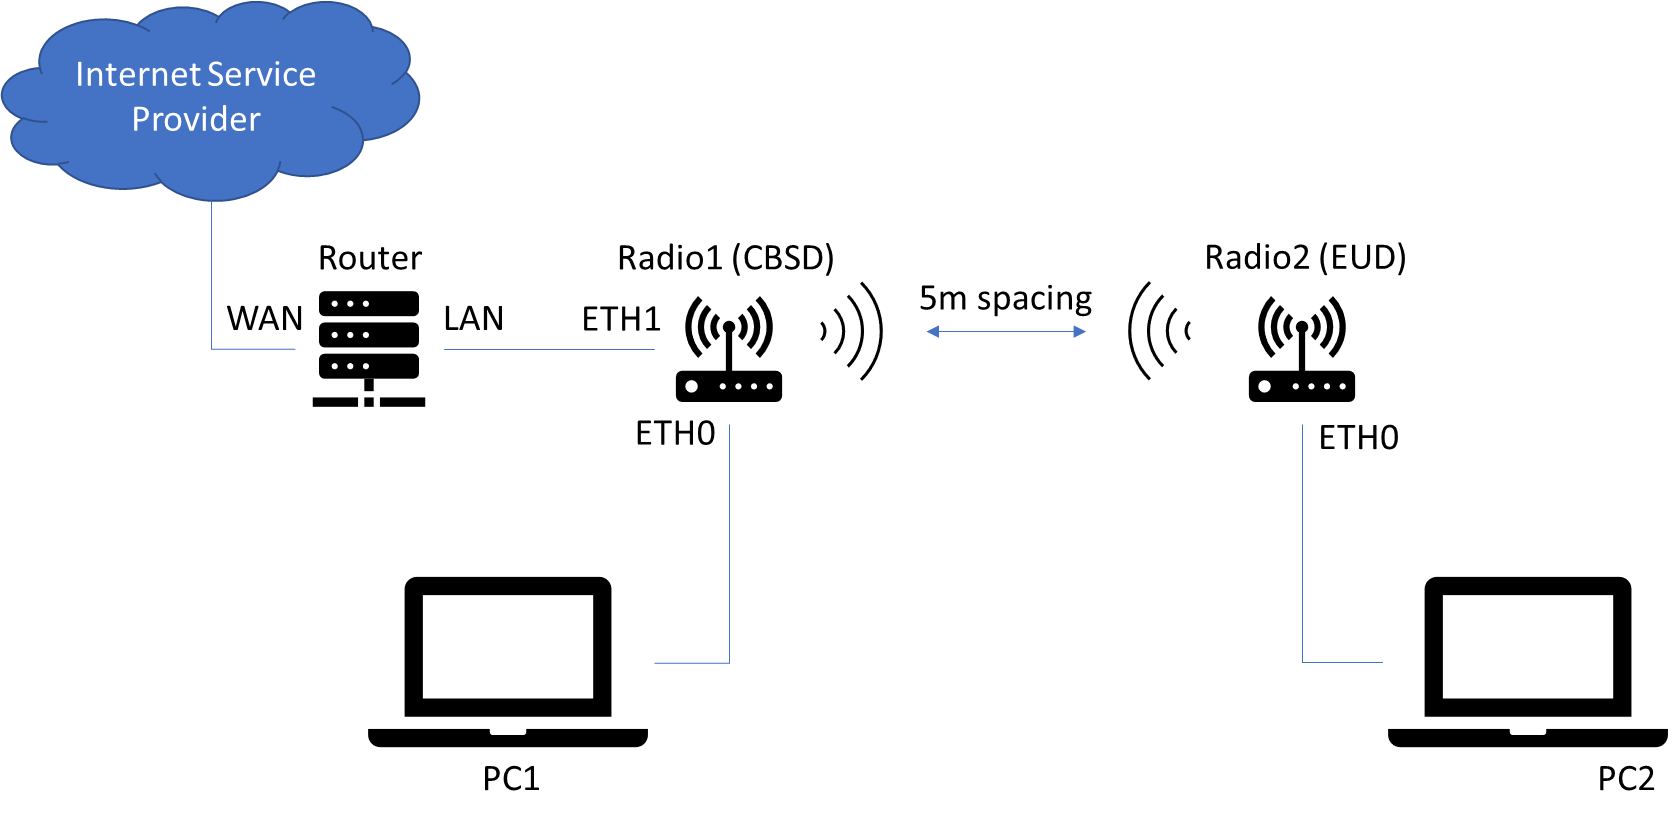
Fig. 3 CBRS Hardware Setup
- The CBSD needs a connection to the internet. This comes from your router connected to your ISP. For a first-time setup, this could be an office router/modem for example.
- The Mesh Rider Radio's Ethernet port (ETH0 and ETH1) are bridged to the wireless interface. Their IP addresses are in the 10.223.0.0/16 subnet as discussed here.
- PC1 and PC2 should have their IP addresses configured in the 10.223.0.0/16 subnet for initial configuration. Ultimately, they will use DHCP to connect to the gateway (your router).
- Keep the radios at least 5m apart during the initial setup to prevent the receivers from saturating.
Firmware Upgrade
This guide is based on the October 2022 CBRS release. The latest firmware is available in the design-in-docs pages discussed above.
Software Configuration
CBSD-A Connected to Google Test SAS
In this guide, we will connect to the Google Test SAS (see CBRS Connection to the Production Google SAS for information on how to connect to the Production Google SAS). The Google Test SAS cannot be used in a real deployment, and the SAS is not available at the following times:
7:00 AM - 8:30 AM UTC
3:00 PM - 4:30 PM UTC
11:00 PM - 12:30 AM UTC
- Start by setting up an appropriate static IP address on PC1 in the 10.223.0.0/16 subnet.
- Make sure you can ping Radio1. If not, see our troubleshooting guide.
- Open up a web browser and put the IP address of Radio1 into the address bar.
- The user name is
rootand the default password isCwE=10X+Nss/. - Click
Advanced Settingsat the lower left-hand corner to see a full list of configuration options. -
If you have set up the hardware correctly, Radio1 should have received an IP address from your router (in addition to it's default IP address). Check that you can ping a site on the internet using the diagnostics tools in the
Network Configuration -> Diagnosticspage.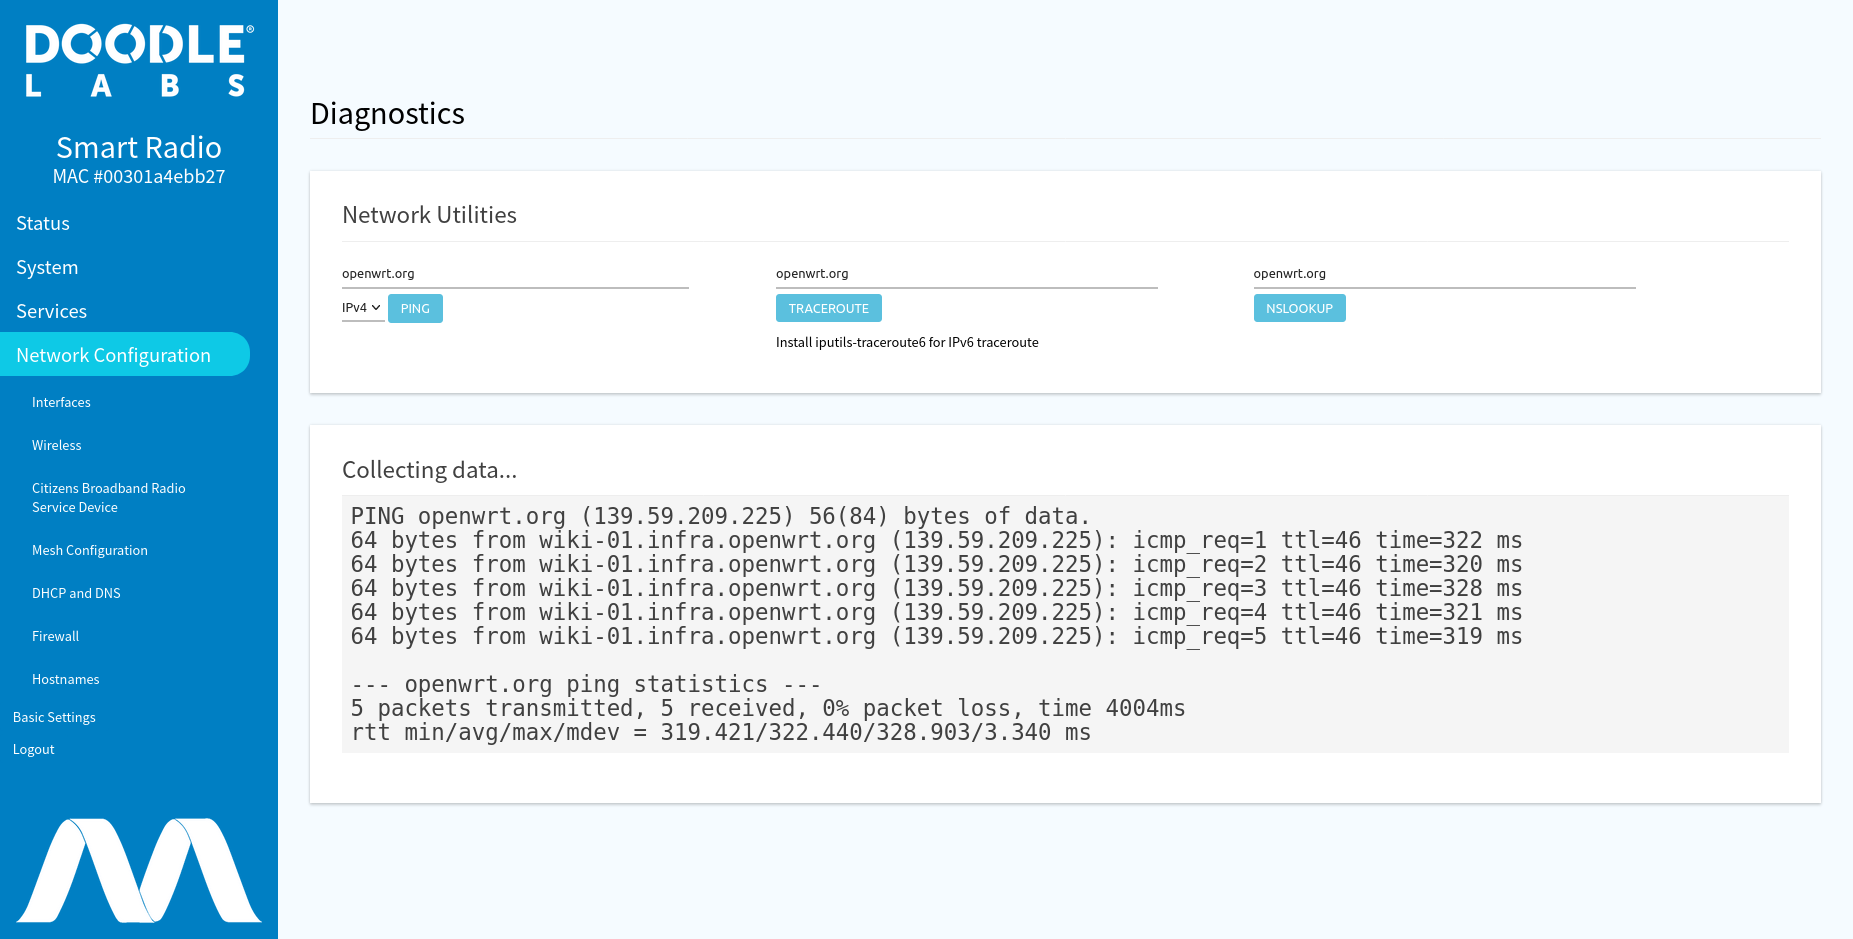
Fig. 4 Internet connectivity check
-
If the device has GPS, you can make sure it has a valid GPS location at the bottom of the
Status -> Overviewpage. If it does not, you will need to be a CPI to manually enter GPS coordinates. - Navigate to
Network-Configuration -> Citizens Broadband Service Deviceto configure the CBRS device. -
An example CBSD-A configuration is shown in Fig. 5. Note that in order to be able to configure the CBSD, you will need either an account with Google SAS for a real-world deployment or you will need to obtain test certificates from your SAS provider for lab testing (e.g. Google test SAS).
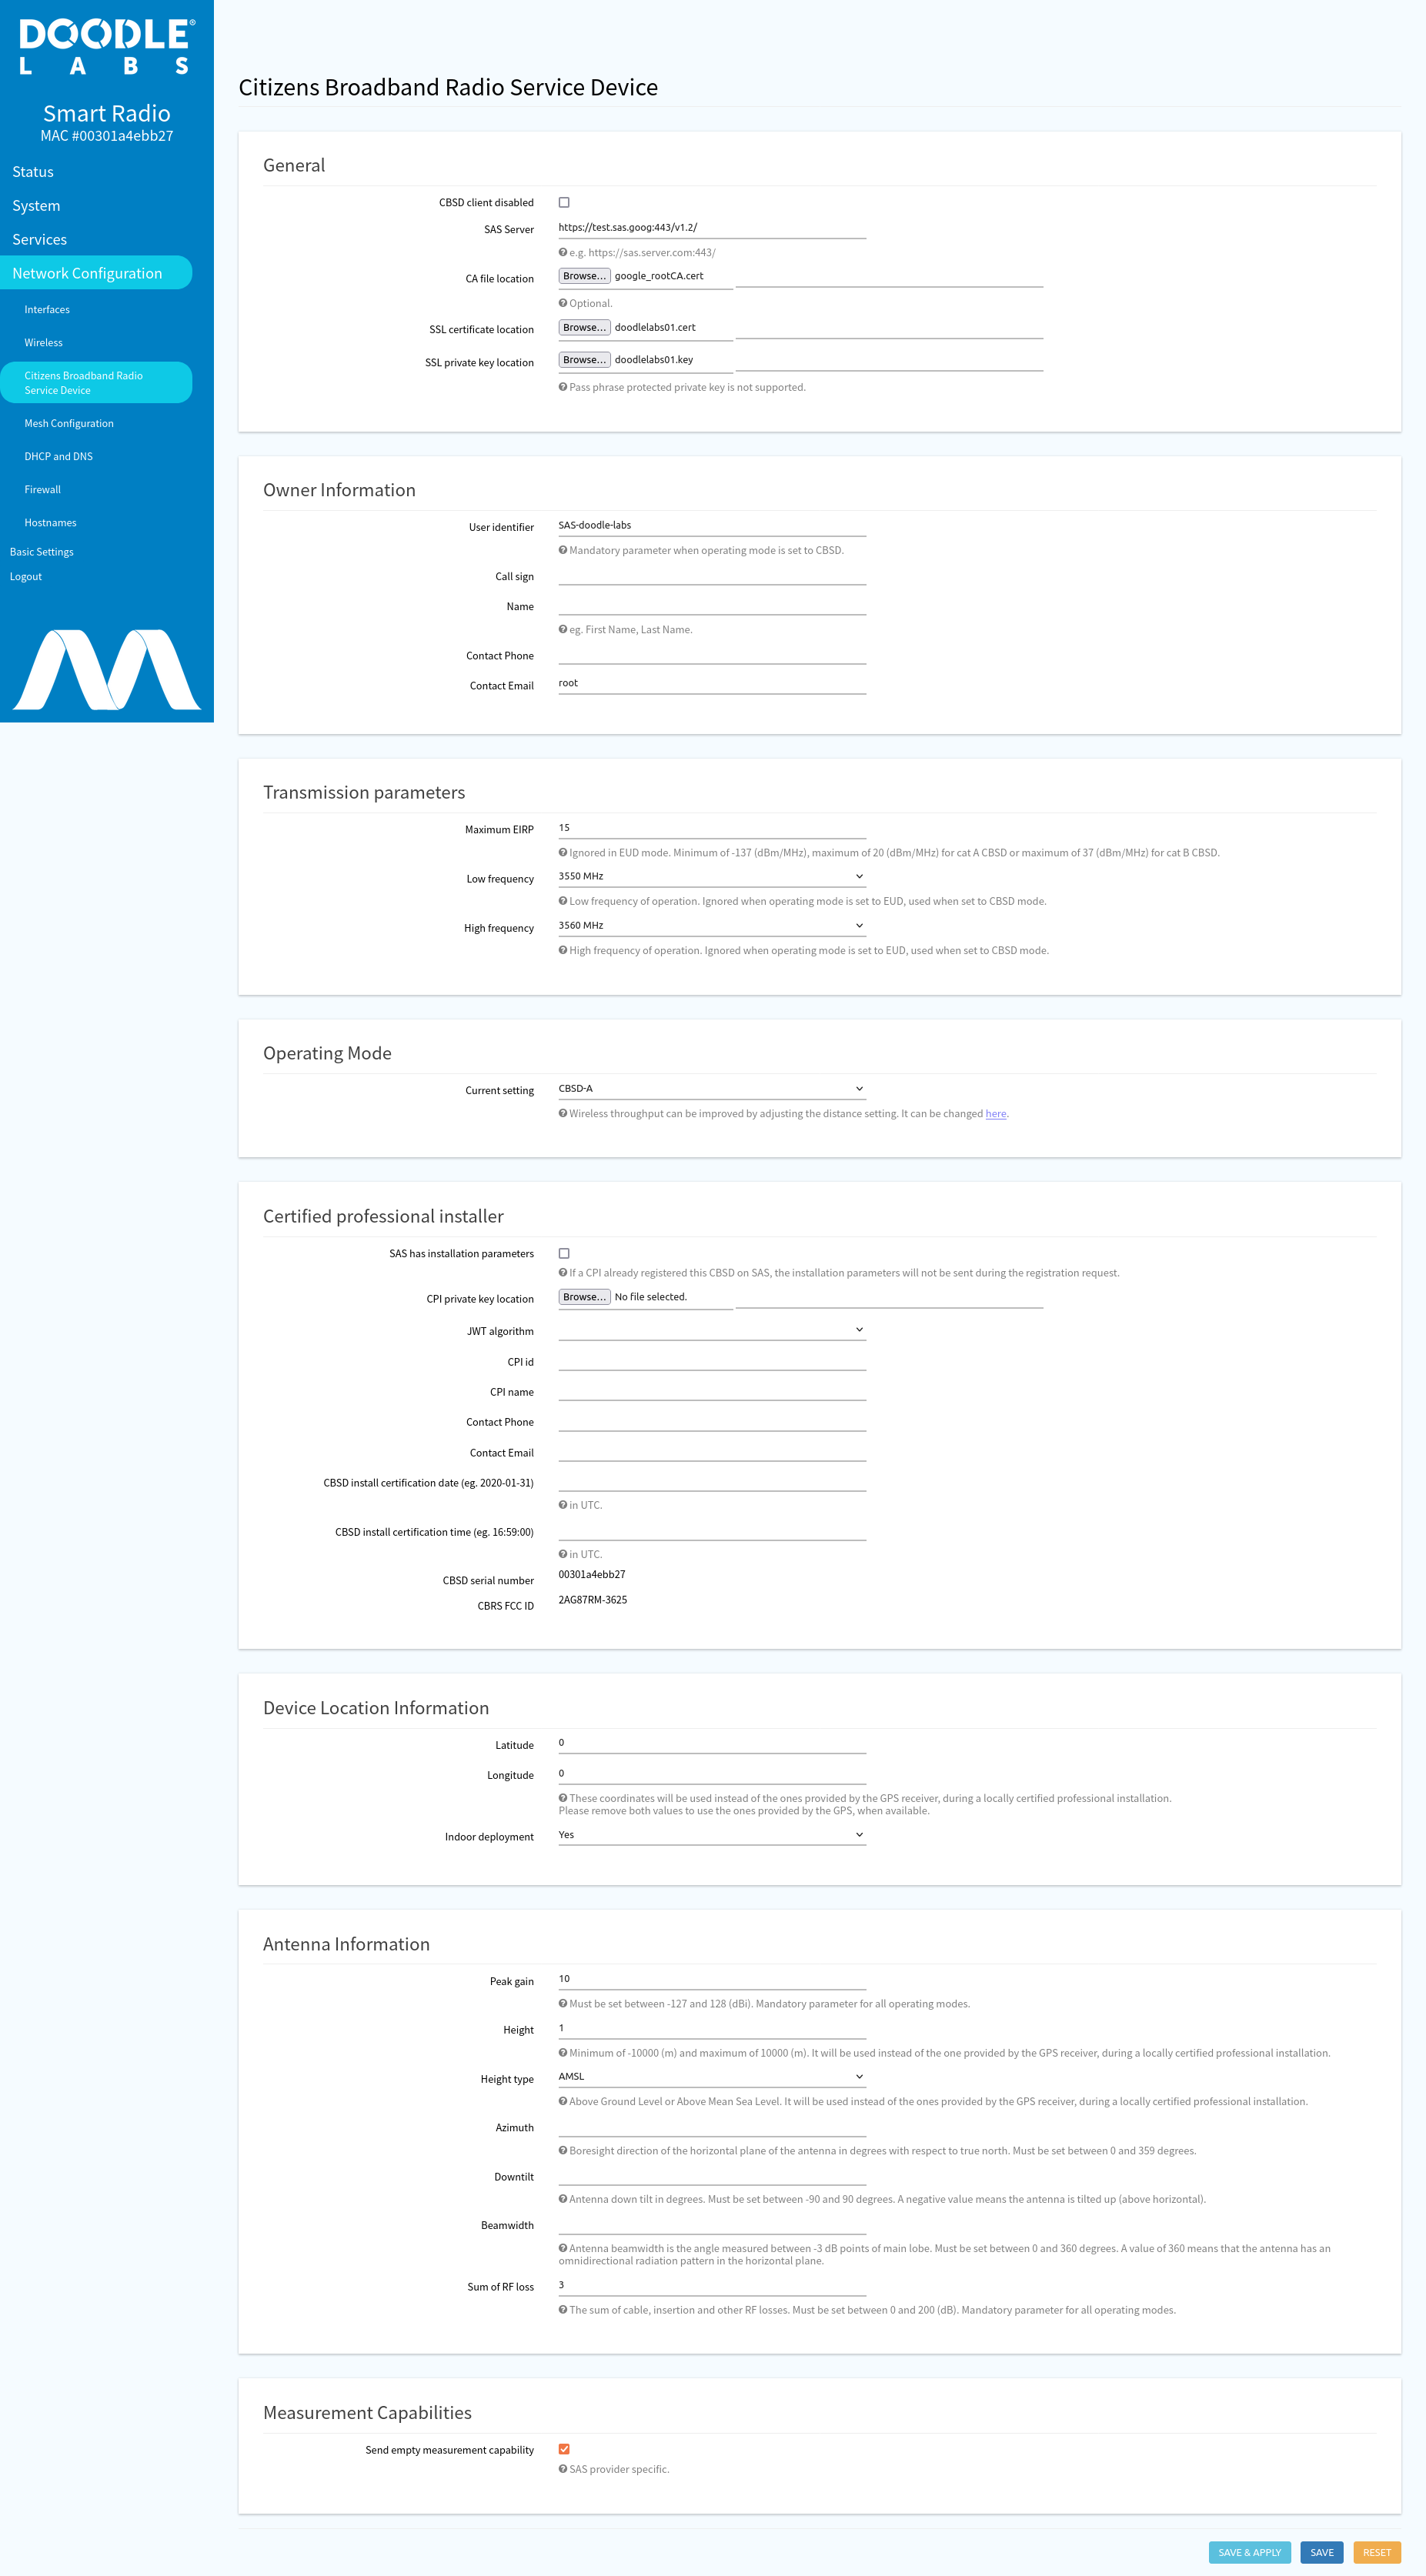
Fig. 5 CBSD-A configuration
- Uncheck the
CBSD Client Disabledbox - SAS Server:
https://test.sas.goog:443/v1.2/(normally provided by SAS provider) - CA file location: e.g.
google_rootCA.cert(normally can be left blank) - SSL certificate location: e.g.
doodlelabs01.cert(request test certificate from Google SAS. Pre-installed certificate is for final deployment) - SSL private key location: e.g.
doodlelabs01.key(request test key from Google SAS. Pre-installed key is for final deployment) - User identifier: e.g.
SAS-doodle-labs(normally provided by SAS provider) - Low frequency: 3550
- High frequency: 3560 (can leave as default 3700)
- Operating Mode: CBSD-A
- The section
Generalcan be left as is on screen. - The section
Owner informationcan be left as is on screen. - Maximum EIRP: 15
- Indoor deployment: yes
- Peak gain: 10
- Antenna height: 1
- Sum of RF loss: 3
Height,Height type,Azimuth,DowntiltandBeamwidthcan have any valid value as they are not used.
- Uncheck the
-
The settings above are just an example. If you are a CBRS CPI, then you can upload your CPI certificates and include your CPI information here too.
- Click
Save & Applyat the bottom of the page. -
You can verify that the CBSD is ready by navigating to the bottom of the
Status -> Overviewpage.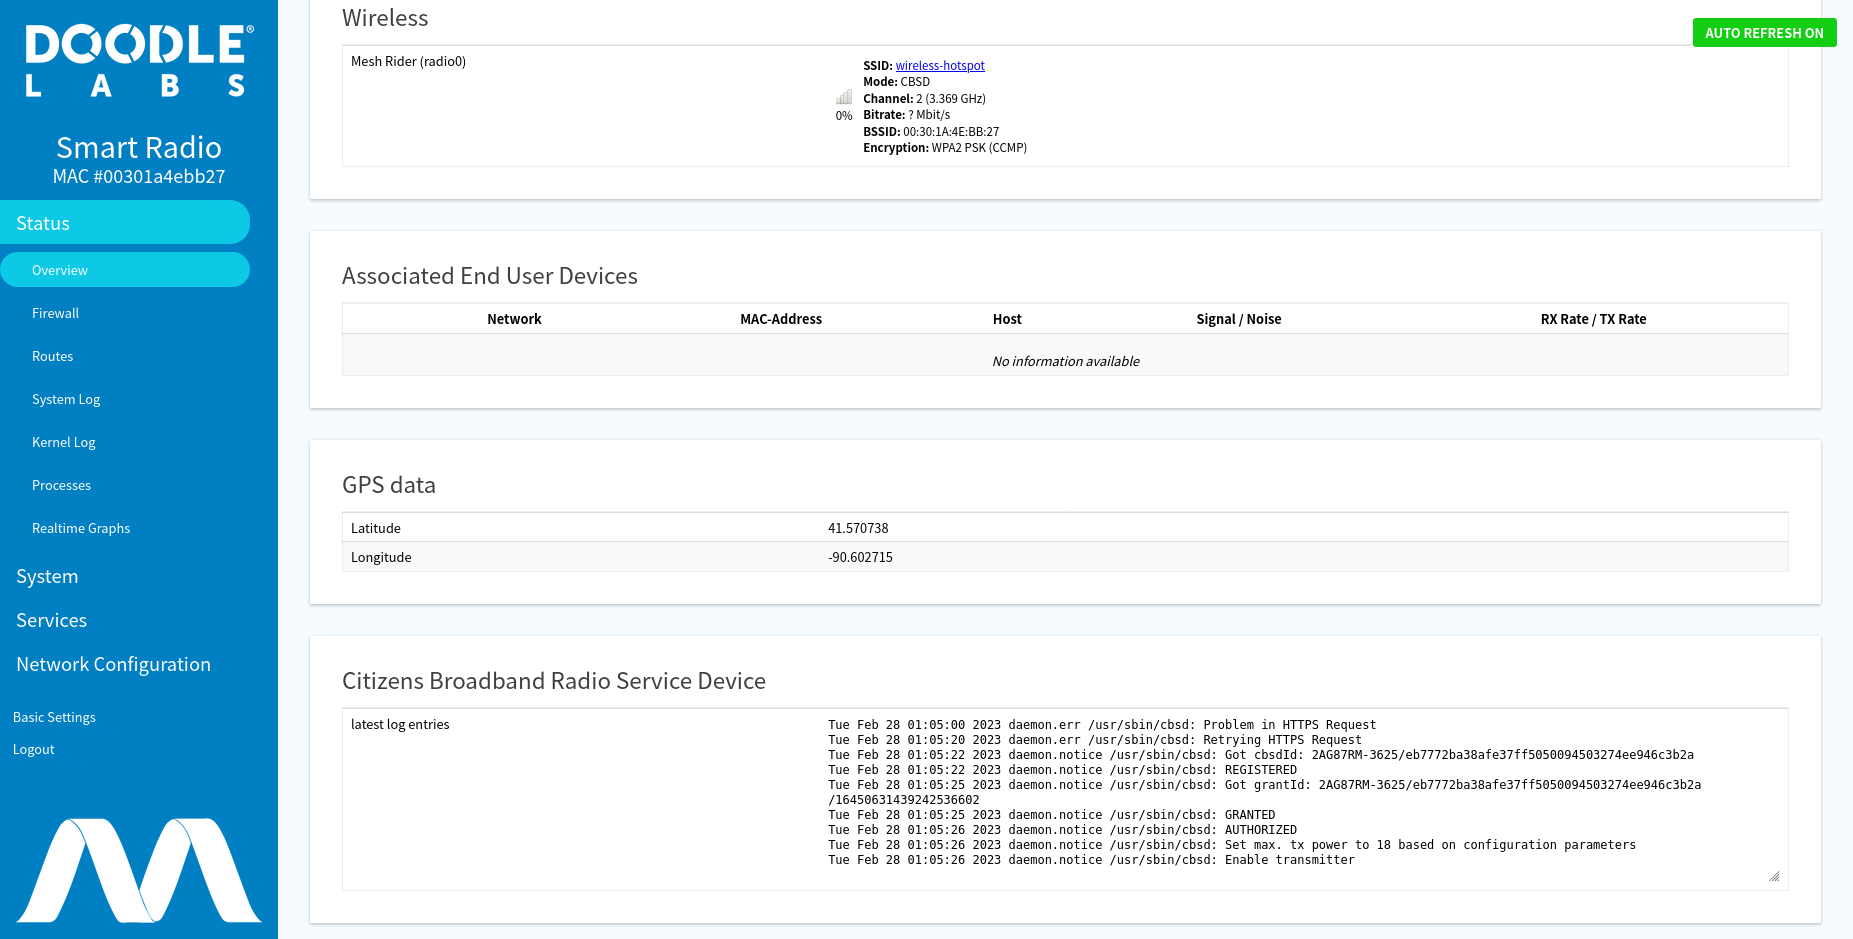
Fig. 6 CBSD Ready
-
The AP starts with an SSID
wireles-hotspotand passwordDoodleSmartRadio. You can change these in theNetwork-Configuration -> wirelessmenu.
EUD
- If you are using an CBRS EUD Mesh Rider Radio, then it will connect automatically to the SAS unless you have modified the wireless SSID and password. Otherwise navigate to the
Network-Configuration -> wirelessmenu and change theESSIDandpasswordappropriately. - If you intend to use a CBSD-enabled device as an EUD, simply change the
Operating Modein theNetwork-Configuration -> Citizens Broadband Service Devicemenu to EUD. -
Once the EUD is connected, you should see an association in the
Network-Configuration -> wirelessmenu.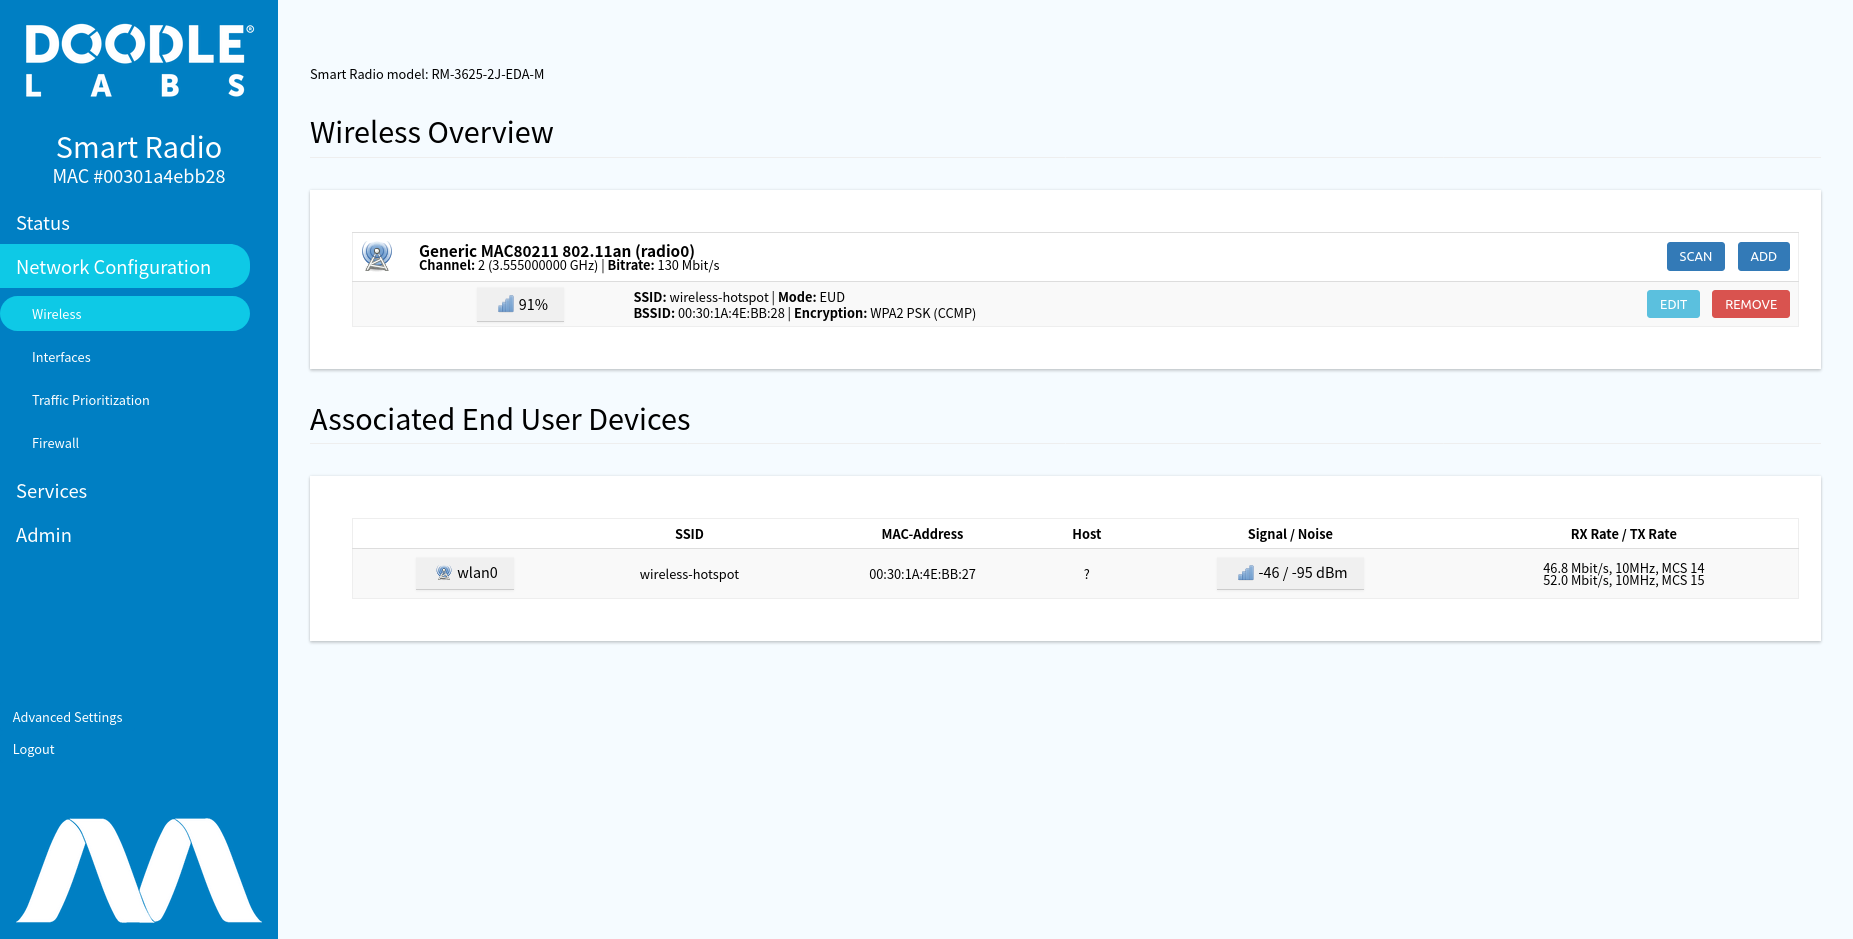
Fig. 7 EUD associated to CBSD
PC2
Ultimately PC2 needs a connection to the internet. If your router runs a DHCP server, then you should now change PC2's IP addressing mode to DHCP client. Radio1 and Radio2 each operate in DHCP client mode in addition to have a static IP address. Therefore, you can login to your router to see the dynamic IP addresses which were assigned to Radio1 and Radio2.
Troubleshooting
If you are experiencing problems with your configuration, you can either look at our troubleshooting pages or contact us for Technical Support.